Red Hat OpenShift is a Kubernetes-based platform for container orchestration. OpenShift differentiates itself from Kubernetes through features such as tight integration with Red Hat Linux, long-term enterprise support, and its platform as a service (PaaS) offering.
Whether you’re using OpenShift or Kubernetes to manage your infrastructure, you need to consider some general security limitations to containerized environments. At the heart of all security concerns is the secret zero problem. The secret zero problem is a reliance on a master key or a “secret zero” that can unlock all other credentials, giving potential attackers access to everything in the organization.
With container orchestration, Docker files and Helm charts become potential targets for revealing secrets or sharing identities, roles, and authorization. Protecting these secrets means encryption, secrets rotation, centralized auditing, separation of duties, and other policies that still allow easy resource management without restricting developer access.
CyberArk Conjur enhances OpenShift’s default security stance by managing and rotating secrets and other credentials. It also ensures secrets are securely passed to applications running in OpenShift. One of the critical differences between OpenShift and Kubernetes is OpenShift’s default settings for platform security. For example, OpenShift uses six security context constraints (SCCs) that default to restricted access for limiting and securing a cluster.
This article shows you how to set up Conjur in a typical OpenShift environment quickly and efficiently. It demonstrates how to store passwords outside the repository while keeping them accessible to applications inside OpenShift. If you’re interested in reading up on the theory behind it, check out the Conjur blog.
Setting Up OpenShift
Like its sister orchestrator Kubernetes, OpenShift is available on most cloud platforms, so it’s easy to install and to get your own hands-on experience. This example uses Google Cloud, but AWS and Azure offer a similar experience.
To install OpenShift on Google Cloud, you need a Google Cloud account and a project. This example uses the gcloud command-line tool to create an OpenShift project.
					$ gcloud init
$ gcloud projects create openshift-conjur --name "OpenShift and Conjur"
$ gcloud config set project openshift-conjur
$ gcloud config list
Note that the project ID, openshift-conjur, should be unique, so use your name.
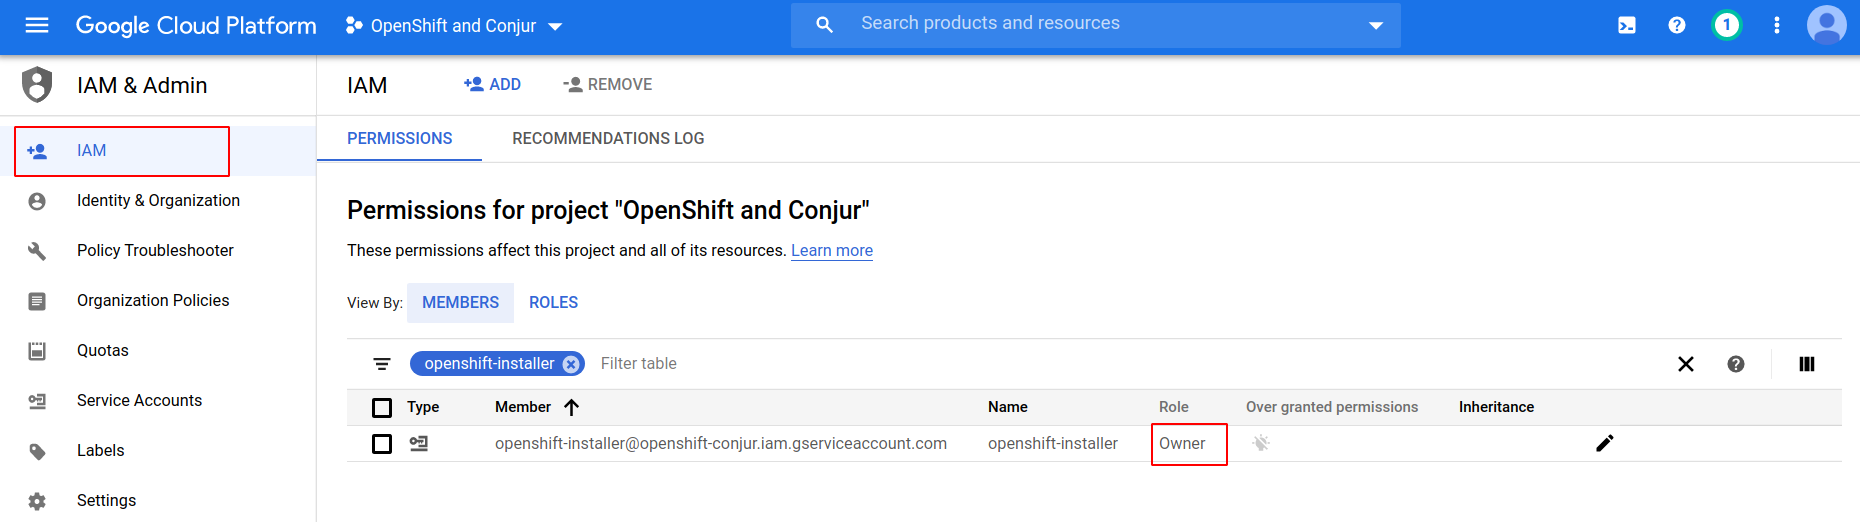
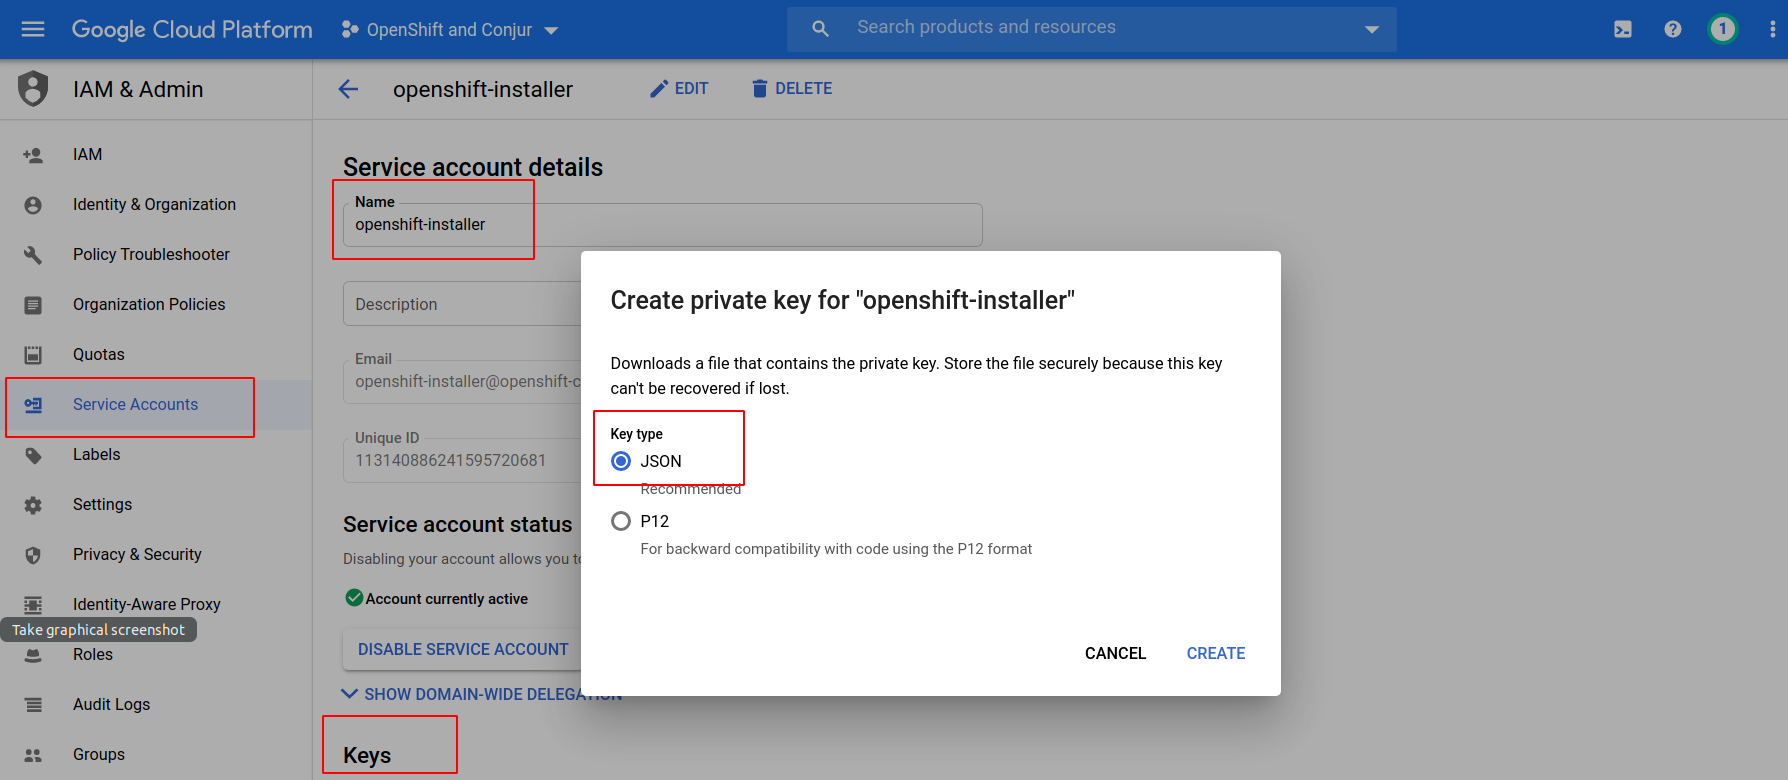
The OpenShift installer creates a cluster in Google Cloud on behalf of the user. For ease of installation, we give the user owner’s rights. In production, you must assign the rights more accurately. Now we create the necessary service account and store its key locally as an openshift-installer.json file:
- cloudresourcemanager
- dns
- compute
- iam
$ gcloud services enable cloudresourcemanager.googleapis.com --project openshift-conjur
					$ gcloud dns managed-zones create ocp --dns-name ocp.example.com --description "OpenShift and Conjur"
$ gcloud dns managed-zones describe ocp
...
nameServers:
- ns-cloud-e1.googledomains.com.
- ns-cloud-e2.googledomains.com.
- ns-cloud-e3.googledomains.com.
- ns-cloud-e4.googledomains.com.
...
Add the name servers to the dns managed-zones section of the domain registrar.
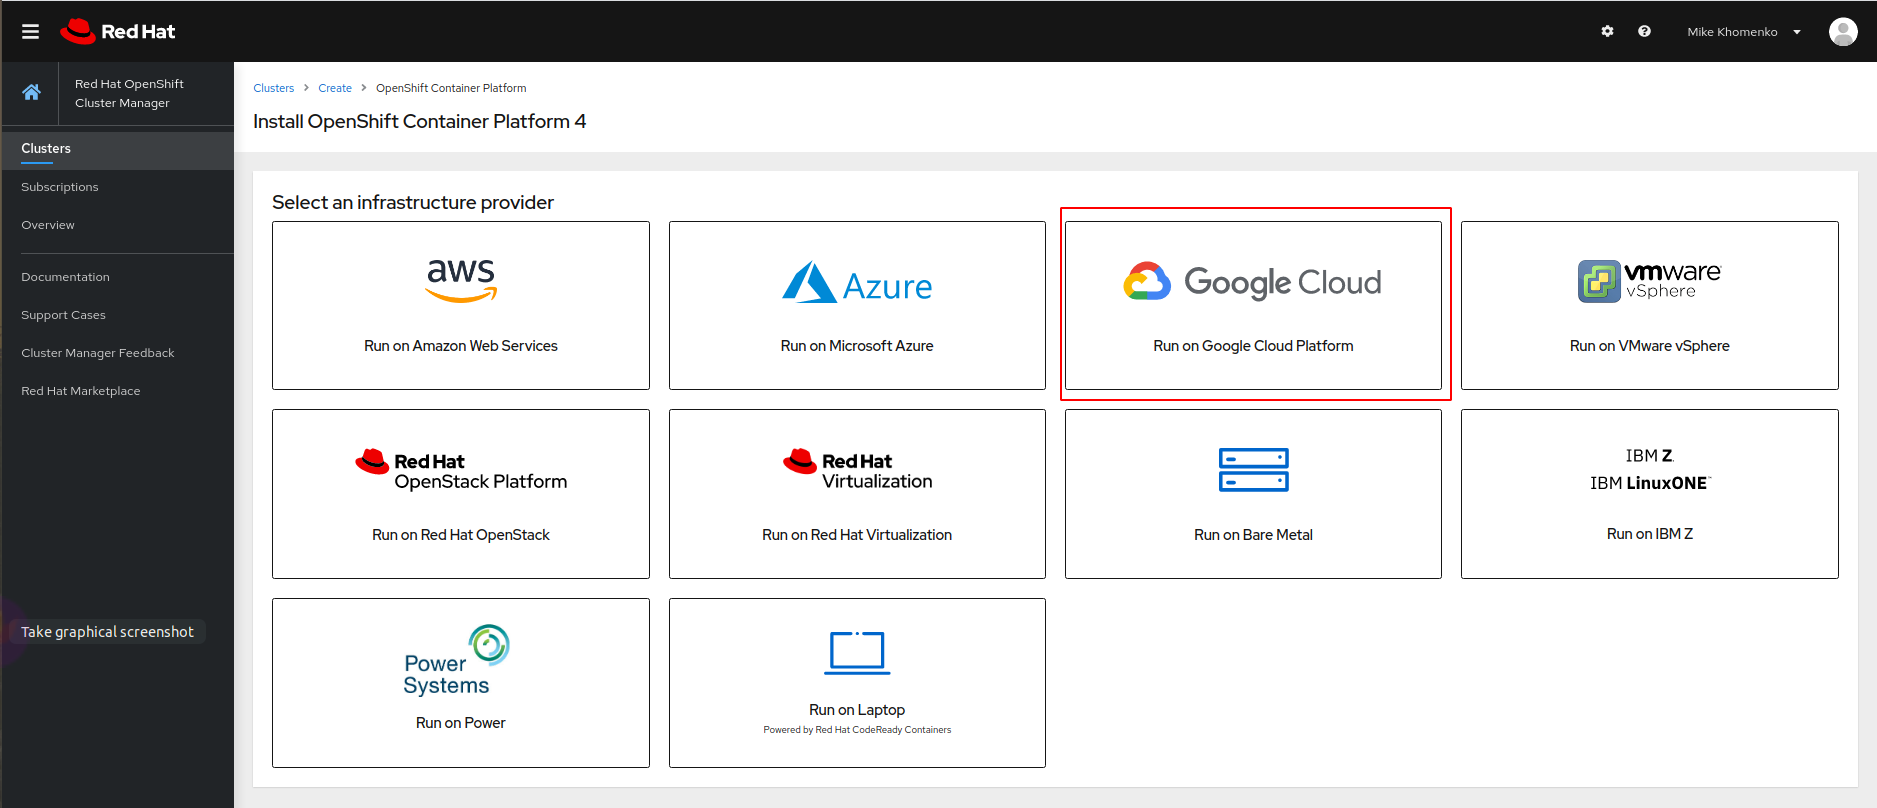
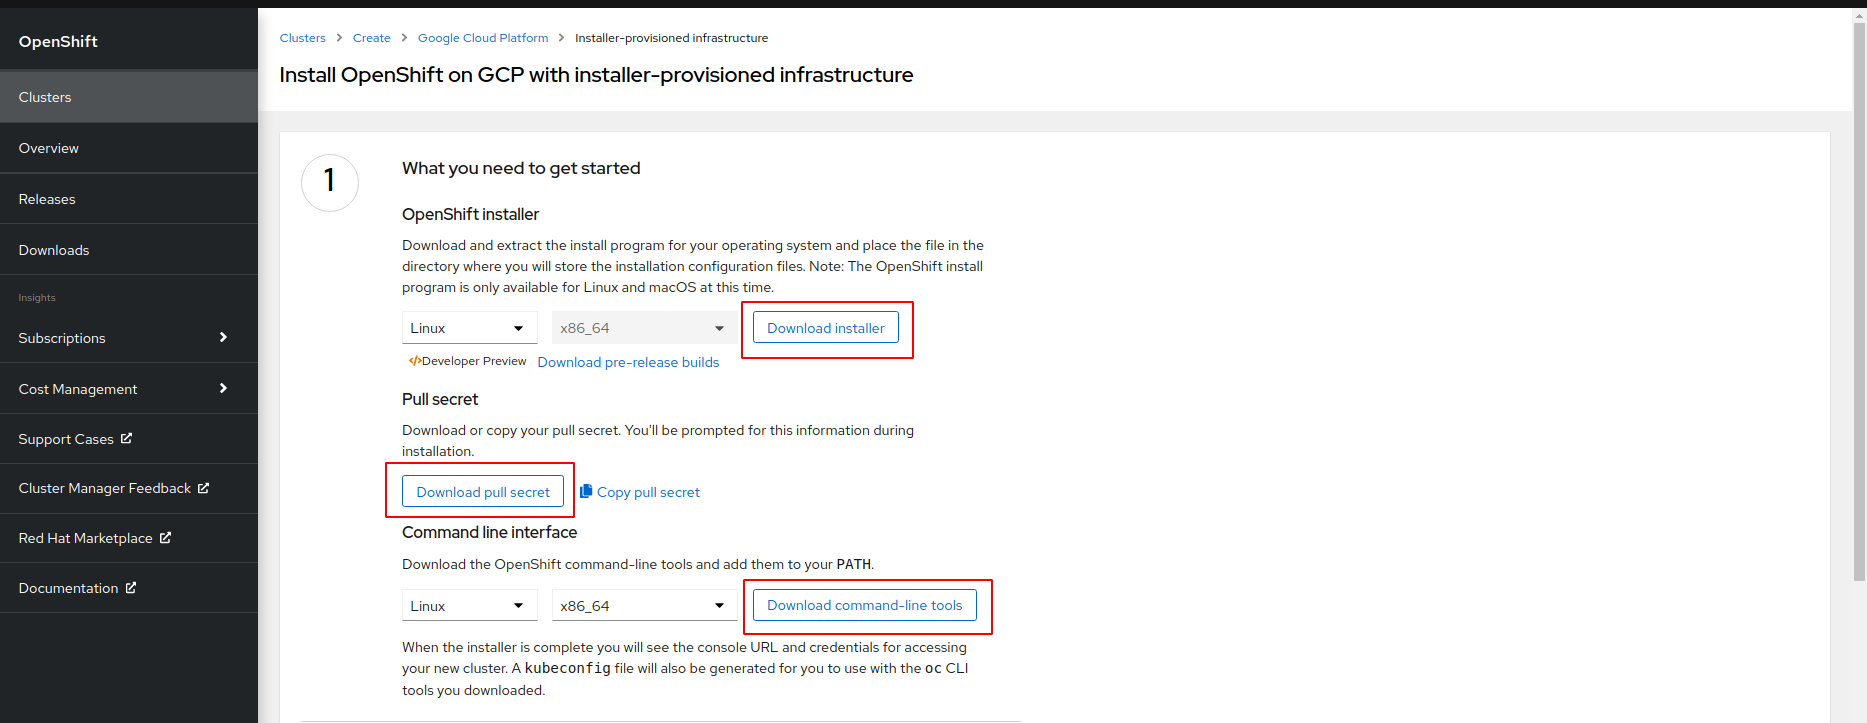
Next, go to the RedHat OpenShift website and create a cluster. You can try it for free by going to Try Red Hat OpenShift and clicking Start your trial in the Self-managed section.
If you must log in, enter your credentials or create a Red Hat account. After a successful login, you see a page describing various options for OpenShift deployment. Here we’re using Google Cloud.
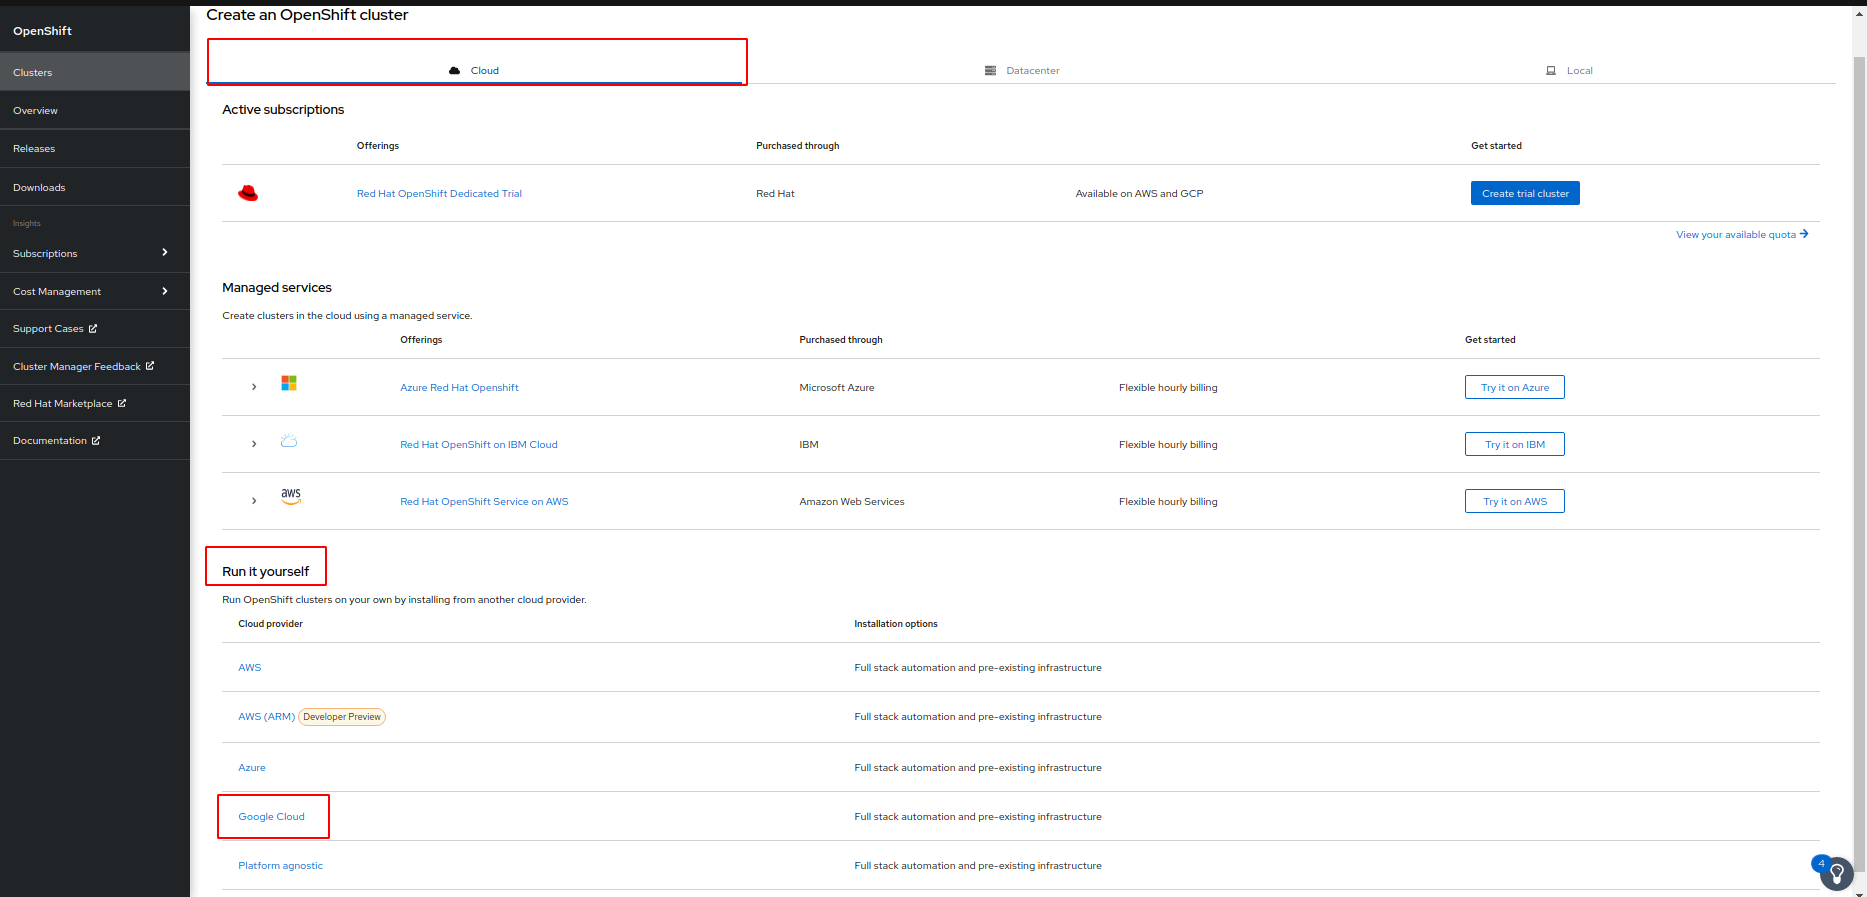
Now you have the choice to rely either on the installer’s default settings (Installer-provisioned infrastructure) or specify some settings yourself (User-provisioned infrastructure). Selecting Installer-provisioned infrastructure is recommended.
Download the installer next. It’s itself a secret used when Docker images from the OpenShift repository download to an OpenShift cluster. Also, download two console utilities for connecting to the cluster: oc and kubectl.
After downloading, unzip and run the installer. The installer might generate files. You can specify a directory for them, so you do not litter the current directory:
$ ./openshift-install create cluster --dir=./gcp
You can optionally add debug output to the ./openshift-install command:
./openshift-install create cluster --dir=./gcp --log-level=debug
You must set up some parameters for the cluster:
| Parameter | Value | Comment |
| SSH Public Key | Path to SSH key | You can generate an SSH key and put it here. It helps gather logs in case any errors occur. |
| Platform | gcp | We install OpenShift on the Google Cloud Platform. |
| Service Account | Absolute path to openshift-installer.json | We created such a key when we created the service account. |
| Project ID | openshift-conjur | Your project name. |
| Region | us-east1 | Choose an appropriate region. |
| Base Domain | ocp.example.com | Your domain name. |
| Cluster Name | ocp-test | Use a suitable name. |
| Pull Secret | Contents of file pull-secret.txt | We initially downloaded this from the OpenShift website. |
If you want to understand the installation process in more detail, the official installation documentation deserves attention. You can start reading from Configuring a GCP project.
Note that the default disk requirements in OpenShift won’t work with the free tier on Google Cloud, and you may need to adjust this for other platforms. You may also need to configure CPU usage quotas. You can change the allotted resources on your cloud platform of choice, or you can configure the resources to be used by OpenShift in the install-config.yaml file (or .gcp/install-config.yaml file if you choose not to litter the current directory).
This code excerpt adjusts the disk to 50 GB and explicitly sets the instance type.
					apiVersion: v1
baseDomain: ocp.example.com
metadata:
  name: ocp-test
platform:
  gcp:
    projectID: openshift-conjur
    region: us-east1
compute:
- architecture: amd64
  hyperthreading: Enabled
  name: worker
  platform:
    gcp:
      osDisk:
        DiskSizeGB: 50
        DiskType: pd-ssd
      type: n1e2-standard-2
      zones:
      - us-east1-b
      - us-east1-c
      - us-east1-d
  replicas: 3
controlPlane:
  architecture: amd64
  hyperthreading: Enabled
  name: master
  platform:
    gcp:
      osDisk:
        DiskSizeGB: 50
        DiskType: pd-ssd
      type: e2-standard-4
      zones:
      - us-east1-b
      - us-east1-c
      - us-east1-d
  replicas: 3
pullSecret: '{...}’ # Content of file pull-secret.txt
kubectl.
					INFO Install complete!
INFO To access the cluster as the system:admin user when using 'oc', run 'export KUBECONFIG=//gcp/auth/kubeconfig'
INFO Access the OpenShift web-console here: https://console-openshift-console.apps.ocp-test.ocp.example.com
INFO Login to the console with user: "kubeadmin", and password: "XyZO-ABCD-eFgH-ijKL"
Run the export command as recommended, then unzip openshift-cli and copy the oc and kubectl utilities to a standard location for custom executables (usually /usr/local/bin).
Check the availability of the OpenShift cluster:
					$ oc get nodes
NAME STATUS ROLES AGE VERSION
ocp-test-7gqpd-master-0.c.openshift-conjur.internal Ready master 25m v1.21.1+9807387
ocp-test-7gqpd-master-1.c.openshift-conjur.internal Ready master 25m v1.21.1+9807387
ocp-test-7gqpd-master-2.c.openshift-conjur.internal Ready master 25m v1.21.1+9807387
ocp-test-7gqpd-worker-b-5tb8g.c.openshift-conjur.internal Ready worker 17m v1.21.1+9807387
ocp-test-7gqpd-worker-c-m22rf.c.openshift-conjur.internal Ready worker 17m v1.21.1+9807387
ocp-test-7gqpd-worker-d-fpm2z.c.openshift-conjur.internal Ready worker 17m v1.21.1+9807387
Now the OpenShift cluster is set up, and we can install Conjur.
Setting Up CyberArk Conjur
Conjur is a way to store sensitive data (secrets) externally rather than inside an application or its repository. Conjur also provides a way to retrieve that data inside an application on demand.
We use an open-source Conjur version here. There is also an enterprise version called Conjur Secrets Manager Enterprise Application Access Manager.
The standard way to deploy any application to Kubernetes and OpenShift is using Helm. Conjur already has a pre-configured Helm Chart making this a straightforward task. We use Helm version three as it doesn’t require installation on the OpenShift side. You can find the Conjur OSS Helm Chart repo on GitHub.
					$ helm version --short
v3.6.3+gd506314
$ helm repo add cyberark https://cyberark.github.io/helm-charts
$ helm repo update
$ helm search repo conjur-oss
NAME                CHART VERSION APP VERSION DESCRIPTION
cyberark/conjur-oss 2.0.4                     A Helm chart for CyberArk Conjur
For this demo, we install both Conjur and PostgreSQL. Conjur uses PostgreSQL as the default database in the OpenShift cluster. Conjur encrypts all data in its databases and generates the encryption key before installation.
					$ DATA_KEY=$(docker run --rm cyberark/conjur data-key generate)
$ helm upgrade conjur cyberark/conjur-oss --install --set dataKey="${DATA_KEY}" --set authenticators="authn\,authn-k8s/demo" --version 2.0.4 --namespace default
Besides dataKey, we set two ways to authenticate clients in Conjur:
authnfor standard authentication (Conjur uses the login and API keys)authn-k8sfor the authentication of pods (Conjur uses the certificate)
You can read about supported authentication types if you’d like to know more.
Once Conjur is running, initialize the built-in admin user and create a default account for further use. We can do this with one command:
$ oc exec -it conjur-conjur-oss-6466669767-zbk6n -c conjur-oss -- conjurctl account create default
$ oc get svc conjur-conjur-oss-ingress -ojsonpath='{.status.loadBalancer.ingress[0].ip}'
<EXTERNAL_IP> to show where to insert your IP.
You can connect to the running Conjur server with a command-line tool called conjur-cli. Run the conjur-cli Docker version locally:
					$ docker run --rm -it cyberark/conjur-cli:5-6.2.4
# conjur init --url=https://<EXTERNAL_IP> --account=default
Trust this certificate (yes/no): yes
Wrote certificate to /root/conjur-default.pem
Wrote configuration to /root/.conjurrc
conjur.myorg.com, is used as the common name. You should change this by either setting the ssl.hostname parameter during Conjur OSS Helm release deployment or changing the host file in the Docker container.
Simply configure the Conjur server IP <EXTERNAL_IP> to correspond to the domain:
					# echo "<EXTERNAL_IP> conjur.myorg.com" >> /etc/hosts
# conjur init --url=https://conjur.myorg.com --account=default
<CERTFICATE_FILE>.
					# conjur authn login -u admin
<Enter the admin API key here>
Logged in
Managing Secrets with Conjur
We’re ready to create a secret that the application uses later. We first declare what application has access to this secret. We make this declaration in the policy file, which you should load onto the Conjur server. Policy files are just declarations of different resources, like users, groups of users, hosts (non-human Conjur clients), layers (groups of hosts), and so on. You can find a policy example on GitHub. The official Get Started guide is quite helpful.
Let’s try a sample policy. Recall that we run commands inside the Docker conjur-cli container. Here’s an example of a policy:
					- !policy
  id: BotApp
  body:
  - !user Dave
  - !host myDemoApp
  - !variable secretVar
  - !permit
    role: !user Dave
    privileges: [read, update, execute]
    resource: !variable secretVar
  - !permit
    role: !host myDemoApp
    privileges: [read, execute]
    resource: !variable secretVar
Load this policy onto the Conjur server:
# conjur policy load root policy.yaml
Store the output somewhere. You need the value of api_key for the application. (For this example, we assume its host is BotApp/myDemoApp and refer to its key as <BotApp API key>.)
Next, check the loaded policy:
					# conjur list
[
  "default:policy:root",
  "default:policy:BotApp",
  "default:user:Dave@BotApp",
  "default:host:BotApp/myDemoApp",
  "default:variable:BotApp/secretVar"
]
secretVar with the value qwerty12.
# conjur variable values add BotApp/secretVar qwerty12
Next, let’s see how to retrieve this secret value from an application.
Running an Application Manually
We use Ubuntu as the application pod. Let’s define the Ubuntu pod on a local machine (not on the conjur-cli container) and deploy it onto OpenShift. Here’s the content of the ubuntu.yaml file to configure the pod:
					apiVersion: apps/v1
kind: Deployment
metadata:
  name: ubuntu
  namespace: demo
spec:
  replicas: 1
  selector:
    matchLabels:
      app: ubuntu
  template:
    metadata:
      labels:
        app: ubuntu
    spec:
      containers:
      - name: ubuntu
        image: ubuntu:20.04
        command: ["/bin/bash", "-c", "tail -f /dev/null"]
Now we deploy the pod using this configuration:
					$ oc create namespace demo
$ oc adm policy add-scc-to-user anyuid -z default -n demo # Allow root in Ubuntu pod
$ oc apply -f ubuntu.yaml
$ oc -n demo get po
NAME                   READY STATUS  RESTARTS AGE
ubuntu-65d559b86-9lnf5 1/1   Running  0       5s
$ oc -n demo exec -it ubuntu-65d559b86-9lnf5 -- bash
# apt update
# apt install -y curl
Let’s retrieve the access token by calling the Conjur server endpoint with the <BotApp API key>:
# curl -d "<BotApp API key>" -k https://conjur-conjur-oss.default.svc.cluster.local/authn/default/host%2FBotApp%2FmyDemoApp/authenticate > /tmp/conjur_token
We next put the access token in the file /tmp/conjur_token.
					# CONT_SESSION_TOKEN=$(cat /tmp/conjur_token| base64 | tr -d '\r\n')
# curl -s -k -H "Content-Type: application/json" -H "Authorization: Token token=\"$CONT_SESSION_TOKEN\"" https://conjur-conjur-oss.default.svc.cluster.local/secrets/default/variable/BotApp%2FsecretVar
qwerty12
That’s the manual process for an application to retrieve a secret.
Automated Token Retrieval with OpenShift
For applications deployed in OpenShift, you can automate the access token retrieval process.
The Kubernetes Authenticator Client is one of three methods to integrate an application and Conjur server on the OpenShift platform. See Kubernetes Authenticator Client and Kubernetes Authentication with Conjur for more information.
You deploy a particular authentication container in the same pod as your application. This container uses a certificate created for the default account (remember the Conjur init command and the certificate file?) and its OpenShift name (namespace, container name, or service account) for authentication by the Conjur server.
After successful authentication, the authentication container retrieves the access token and puts it into a directory shared with the application container. The application can simply use this token file in its API calls to the Conjur server.
Let’s do it. Conjur recommends storing the certificate as a ConfigMap.
$ oc -n demo create configmap conjur-cert --from-file=ssl-certificate=
demo-app service account:
$ oc adm policy add-scc-to-user anyuid -z demo-app -n demo
Here’s a sample of ubuntu.yaml file configuration:
					---
apiVersion: v1
kind: ServiceAccount
metadata:
  name: demo-app
  namespace: demo
---
apiVersion: apps/v1
kind: Deployment
metadata:
  name: ubuntu
  namespace: demo
spec:
  replicas: 1
  selector:
    matchLabels:
      app: ubuntu
  template:
    metadata:
      labels:
        app: ubuntu
    spec:
      containers:
      - name: ubuntu
        image: ubuntu:1820.04
        command: ["/bin/bash", "-c", "tail -f /dev/null"]
        env:
        - name: CONJUR_APPLIANCE_URL
          value: "https://conjur-conjur-oss.default.svc.cluster.local/authn-k8s/demo"
        - name: CONJUR_ACCOUNT
          value: default
        - name: CONJUR_AUTHN_TOKEN_FILE
          value: /run/conjur/access-token
        - name: CONJUR_SSL_CERTIFICATE
          valueFrom:
            configMapKeyRef:
              name: conjur-cert
              key: ssl-certificate
        volumeMounts:
        - mountPath: /run/conjur
          name: conjur-access-token
          readOnly: true
      - name: ubuntu-auth
        image: cyberark/conjur-authn-k8s-client
        env:
        - name: MY_POD_NAME
          valueFrom:
           fieldRef:
              fieldPath: metadata.name
        - name: MY_POD_NAMESPACE
          valueFrom:
           fieldRef:
              fieldPath: metadata.namespace
        - name: MY_POD_IP
          valueFrom:
            fieldRef:
             fieldPath: status.podIP
        - name: CONJUR_AUTHN_URL
          value: "https://conjur-conjur-oss.default.svc.cluster.local/authn-k8s/demo"
        - name: CONJUR_ACCOUNT
          value: default
        - name: CONJUR_AUTHN_LOGIN
          value: "host/conjur/authn-k8s/demo/demo/service_account/demo-app"
        - name: CONJUR_SSL_CERTIFICATE
          valueFrom:
            configMapKeyRef:
              name: conjur-cert
              key: ssl-certificate
        volumeMounts:
        - mountPath: /run/conjur
          name: conjur-access-token
      serviceAccountName: demo-app
      volumes:
      - name: conjur-access-token
        emptyDir:
          medium: Memory
Now we apply the configuration:
$ oc apply -f ubuntu.yaml
To make this example work, we should also add a corresponding policy. Note that correctly writing policy requires some experience. It’s helpful to know how to enable and disable debugging on the Conjur server. In both cases, the pod restarts.
Here’s an example of enabling debugging:
$ oc set env deployment/conjur-conjur-oss -c conjur-oss CONJUR_LOG_LEVEL=debug
And here’s an example of disabling debugging:
$ oc set env deployment/conjur-conjur-oss -c conjur-oss CONJUR_LOG_LEVEL-
During the debugging session, you may find errors in Conjur server logs like this:
Authentication Error: #<Errors::Authentication::Security::WebserviceNotFound: CONJ00005E Webservice 'demo' not found>
					Host id default:host:conjur/authn-k8s/demo/demo/service_account/demo-app extracted from CSR common name
Authentication Error: #<NoMethodError: undefined method `RoleNotFound' for Errors::Authentication::Security:Module>
This means we lack a host declaration for our application.
Authentication Error: #<Errors::Authentication::Security::RoleNotAuthorizedOnWebservice: CONJ00006E 'default:host:conjur/authn-k8s/demo/demo/service_account/demo-app' does not have 'authenticate' privilege on demo>
# conjur policy load root app.yaml
<AUTHENTICATOR_ID> with “demo” and <CONJUR_ACCOUNT> with “default.”
					# cat app.yaml
- !policy
  id: conjur/authn-k8s/demo
  body:
  - !webservice
  - !layer
    id: demo-app
  - !host
    id: demo/service_account/demo-app
    annotations:
      authn-k8s/namespace: demo
      authn-k8s/authentication-container-name: ubuntu-auth
  - !grant
    role: !layer demo-app
    member: !host demo/service_account/demo-app
  - !permit
    resource: !webservice
    privilege: [ authenticate ]
    role: !layer demo-app
# CA cert and key for creating client certificates
  - !policy
    id: ca
    body:
    - !variable
      id: cert
      annotations:
        description: CA cert for Kubernetes Pods.
    - !variable
      id: key
      annotations:
        description: CA key for Kubernetes Pods.
  - !variable test
  - !permit
    role: !layer demo-app
    privileges: [ read, execute ]
    resource: !variable test
After loading the policy, the authenticator can successfully retrieve the access token from the Conjur server and put it into the /run/conjur/access-token file. Everything is ready to just use this token. You can create a variable to try it out:
					# conjur policy load root app.yaml
# # Run bash script from Enable Authenticators for Applications
# conjur variable values add conjur/authn-k8s/demo/test 1234567890
Finally, let’s put it to the test:
					$ oc -n demo exec -it ubuntu-64877b4d84-jw6r4 -c ubuntu -- bash
# apt update && apt install -y curl
# CONT_SESSION_TOKEN=$(cat /run/conjur/access-token| base64 | tr -d '\r\n')
# curl -s -k -H "Content-Type: application/json" -H "Authorization: Token token=\"$CONT_SESSION_TOKEN\"" https://conjur-conjur-oss-ingress.default.svc.cluster.local/secrets/default/variable/conjur%2Fauthn-k8s%2Fdemo%2Ftest
1234567890
The Ubuntu application can now use this secret variable without any credentials. Conjur applications do all the hard work behind the scenes. We simply use the results.
Next Steps
In this article, we showed you how to set up CyberArk Conjur on the OpenShift platform. The resulting OpenShift with Conjur solution helps secure your applications by ensuring secrets come from the secure vault and are not floating around in your application configuration.
Try it yourself! Download Conjur to add an extra layer of protection to your OpenShift environment by managing secrets effectively. If you have any questions, get in touch with support or request a custom demo.
If you’re interested in developing expert technical content that performs, let’s have a conversation today.