Kubernetes was designed to scale. A team can start a small cluster and progressively expand its installation. After a while, the cluster may be running dozens of pods and hundreds of containers, or even more.
However, without organization, the number of deployed services and objects can quickly get out of control, leading to performance, security, and other issues.
In this post, we’ll examine three key tools you can use to help keep your Kubernetes cluster organized: namespaces, labels, and annotations.
How namespaces work
By default, Kubernetes provides just one workable namespace on top of a physical cluster in which you create all Kubernetes objects. Eventually, though, your project is likely to grow to a point where a single namespace will become a limitation.
Luckily, you can think of a namespace as a virtual cluster, and Kubernetes supports multiple virtual clusters. Configuring multiple namespaces creates a sophisticated façade, freeing your teams from working with a single namespace and improving manageability, security, and performance.
Different companies will adopt different namespace strategies, depending on factors such as team size, structure, and the complexity of their projects. A small team working with a few microservices can easily deploy all services into the default namespace. But for a rapidly growing company, with far more services, a single namespace could make it hard to coordinate the team’s work. In this case, the company could create sub-teams, with a separate namespace for each.
In larger companies, too, teams may be widely dispersed, often working on projects that other teams aren’t aware of, making it hard to keep up with frequent changes. Third-party companies might also contribute to the platform, further increasing complexity. Coordinating so many resources is an administrative challenge, and for developers it becomes impossible to run the entire stack on the local machine. In addition to technologies such as service mesh and multi-cloud continuous delivery, multiple namespaces are essential to managing large-scale scenarios.
When different teams deploy projects to the same namespace, they risk affecting each other’s work. By providing isolation and team-based access security, separate namespaces help ensure teams work on their own without disrupting others. You can also set a resource quota per namespace, so that a resource-hungry application doesn’t exhaust the cluster capacity, impacting other teams’ resources.
Using namespaces
When you create a cluster, Kubernetes provides three namespaces out-of-the-box. To list the namespaces that come with the cluster, run the following command:
					$kubectl get namespaces
NAME          STATUS   AGE
default       ACTIVE   2d
kube-system   ACTIVE   2d
kube-public   ACTIVE   2d
The kube-system namespace is reserved for the Kubernetes engine and is not meant for your use. The kube-public namespace is where public access data is stored, such as cluster information.
The default namespace is where you create apps and services. Whenever you create a component and don’t specify a namespace, Kubernetes creates it in the default namespace. But using the default namespace is suitable only when you’re working on small systems.
You can create a Kubernetes namespace with a single kubectl command:
kubectl create namespace test
Alternatively, you can create namespaces with a YAML configuration file, which might be preferable if you want to leave a history in your configuration file repository of the objects that have been created in a cluster. The following demo.yaml file shows how to create a namespace with a configuration file:
					kind: Namespace
apiVersion: v1
metadata:
  name: demo
  labels:
     name: demo
kubectl apply -f demo.yaml
The problem is, each project has its own lifecycle and you don’t want to mix development and production resources. So, as your projects get more complicated, your cluster needs a more sophisticated namespace solution. You could further split your cluster into development, staging, and production environments:Imagine having three projects—sales, billing, and shipping. You wouldn’t want to deploy all of them into a single default namespace, for the reasons presented earlier, so you’d start by creating one namespace per project.
					kind: Namespace
apiVersion: v1
metadata:
  name: dev
  labels:
    name: dev
kubectl apply -f dev.yaml
kind: Namespace
apiVersion: v1
metadata:
  name: staging
  labels:
    name: staging
kubectl apply -f staging.yaml
kind: Namespace
apiVersion: v1
metadata:
  name: prod
  labels:
    name: prod
kubectl apply -f prod.yaml
Here’s a list of potential namespaces you might employ, depending on the needs of your projects:
- sales-dev
- sales-staging
- sales-prod
- billing-dev
- billing-staging
- billing-prod
- shipping-dev
- shipping-staging
- shipping-prod
There are two ways to explicitly tell Kubernetes in which namespace you want to create your resources.
You can specify the namespace flag when creating the resource with the kubectl apply command:
kubectl apply -f pod.yaml --namespace=demo
You can also modify the YAML configuration file metadata to include the destination namespace attribute:
					apiVersion: v1
kind: Pod
metadata:
  name: testpod
  namespace: demo
  labels:
    name: testpod
spec:
  containers:
  - name: testpod
    image: nginx
If you predefine the namespace in the YAML declaration, the resource will always be created in that namespace. If you try to run the kubectl apply command with the namespace flag to set a different namespace for this resource, the command will fail.
Using labels
As the number of objects in your cluster grows, it can be hard to find and organize them. The increased complexity of the projects means their multi-dimensional components may cross boundaries and challenge rigid cluster structures. Labels let you attach meaningful and relevant metadata to cluster objects so they can be categorized, found, and operated on in bulk.
Labels are key/value structures assigned to objects. An object can be assigned one or more label pairs or no label at all. Labels can be useful for:
- Determining whether a pod is part of a production or a canary deployment
- Differentiating between stable and alpha releases
- Specifying to which layer (UI, business logic, database, and so forth) an object belongs
- Identifying whether a pod is front-end or back-end
- Specifying an object’s release version (V1.0, V2.0, V2.1, and so on)
For example, the following configuration file defines a pod that has two labels: layer: interface and version: stable.
					apiVersion: v1
kind: Pod
metadata:
  name: app-gateway
  labels:
    layer: interface
    version: stable
Once the labels are in place, you can use label selectors to select Kubernetes objects according to criteria you define.
Let’s say you have some pods in a cluster and they’ve been assigned labels. The following command will get you all pods and their labels:
					kubectl get pods --show-labels
NAME        READY STATUS  RESTARTS AGE LABELS
app-gateway 1/1   Running 0        1m  layer=interface,version=stable
micro-svc1  1/1   Running 0        1m  layer=business,version=stable
micro-svc2  1/1   Running 0        1m  layer=business,version=alpha
Kubernetes lets you use label selectors to run the same kubectl get pods command and retrieve only pods with the specified labels. The following –L selector allows you to display only the layer label:
					NAME        READY STATUS  RESTARTS AGE LABELS
app-gateway 1/1   Running 0        1m  interface
micro-svc1  1/1   Running 0        1m  business
micro-svc2  1/1   Running 0        1m  business
If you want to filter the results and retrieve just the interface pods, you can use the -l and specify this condition:
					kubectl get pods -l=layer=interface --show-labels
NAME        READY STATUS  RESTARTS AGE LABELS
app-gateway 1/1   Running 0        1m  layer=interface,version=stable
For more on label and label selectors, refer to the Kubernetes Labels and Selectors page.
Using annotations
Annotations are similar to labels. They’re also structured as key/value pairs, but unlike labels, they’re not intended to be used in searches.
So why should you bother to use annotations, when you can use labels?
Imagine having to organize a warehouse where boxes are stored. These boxes have small labels with important data attached outside, to help you identify, group, and arrange them. Now imagine that each of these boxes contains information. Think of these contents as annotations that you can retrieve when you open the box, but that you don’t need to be visible from the outside.
Unlike labels, annotations can’t be used to select or identify Kubernetes objects, so you can’t use selectors to query them. You could store this kind of metadata in external databases, but that would be complicated. Instead, you can conveniently attach annotations to the object itself. Once you access the object, you can read the annotations.
Annotations can be helpful for a number of use cases, including:
- The Docker registry where a pod’s containers are stored
- The git repo from which a container is built
- Pointers to logging, monitoring, analytics, or audit repositories
- Debugging-related information, such as name, version, and build information
- System information, such as URLs of related objects from other ecosystem components
- Rollout metadata, such as config or checkpoints
- Phone or email of people in charge of the component’s project
- The team’s website URL
In the following example, a pod configuration file has the information on the git repo from which a container is built, as well as the team manager’s phone number:
					apiVersion: v1
kind: Pod
metadata:
  name: annotations-test
  annotations:
    repo: "https://git.your-big-company.com.br/lms/new-proj"
    phone: 800-555-1212
spec:
  containers:
  - name: nginx
    image: nginx:1.14.2
    ports:
    - containerPort: 80
You can also add annotations to an existing pod is with the annotate command:
kubectl annotate pod annotations-test phone=800-555-1212
To access pod annotations, you can use:
kubectl describe pod your-pod-name
This will give you a full description of your pod, or you can use kubectl get pods command with the JSONPath template to read just the annotation data from pods:
kubectl get pods -o=jsonpath="{.items[*]['metadata.annotations']}"
Now you’re ready to organize
Namespaces, labels, and annotations are handy tools for keeping your Kubernetes cluster organized and manageable.
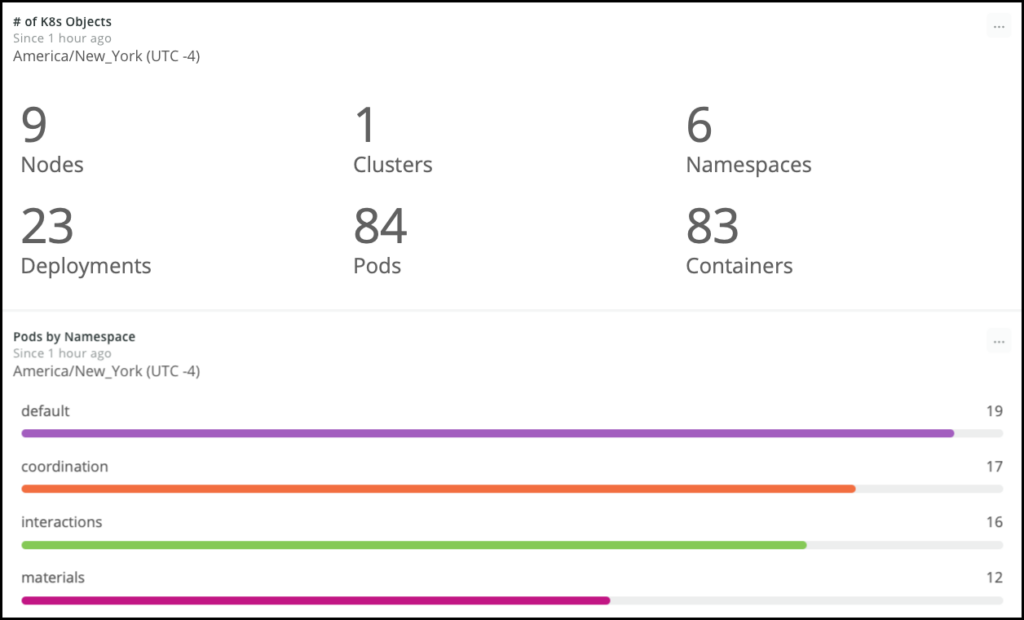
A New Relic One dashboard showing Kubernetes information and a breakdown of pods by namespace.
None of these tools are hard to use. As with most things in Kubernetes, the individual concepts are easy to learn—there are just a lot of them to learn.
But now you’re further along your Kubernetes journey because you understand namespaces, labels, and annotations—and how to use them!
This article was originally published on New Relic’s blog.
If you’re interested in developing expert technical content that performs, let’s have a conversation today.