Search

Kubernetes Fundamentals, Part 1: How to Manage Cluster Capacity with Requests and Limits

This is part one of a five-part series on Kubernetes Fundamentals. Check back for new parts in the following weeks.

Kubernetes is a system for automating containerized applications. It manages the nodes in your cluster, and you define the resource requirements for your applications. Understanding how Kubernetes manages resources, especially during peak times, is important to keep your containers running smoothly.

In this post, we’ll take a look at how Kubernetes manages CPU and memory using requests and limits.

How requests and limits work

Every node in a Kubernetes cluster has an allocated amount of memory (RAM) and computational power (CPU) that can be used to run containers.

Kubernetes defines a logical grouping of one or more containers into Pods. Pods, in turn, can be deployed and managed on top of the nodes. When you create a Pod, you normally specify the storage and networking that containers share within that Pod. The Kubernetes scheduler will then look for nodes that have the resources required to run the Pod.

To help the scheduler, we can specify a lower and upper RAM and CPU limits for each container using requests and limits. These two keywords enable us to specify the following:

  • By specifying a request on a container, we are setting the minimum amount of RAM or CPU required for that container. Kubernetes will roll all container requests up into a total Pod request. The scheduler will use this total request to ensure the Pod can be deployed on a node with enough resources.
  • By specifying a limit on a container, we are setting the maximum amount of RAM or CPU that the container can consume. Kubernetes translates the limits to the container service (Docker, for instance) that enforces the limit. If a container exceeds its memory limit, it may be terminated and restarted, if possible. CPU limits are less strict and can generally be exceeded for extended periods of time.

Let’s see how requests and limits are used.

Setting CPU requests and limits

Requests and limits on CPU are measured in CPU units. In Kubernetes, a single CPU unit equals a virtual CPU (vCPU) or core for cloud providers, or a single thread on bare metal processors.

Under certain circumstances, one full CPU unit can still be considered a lot of resources for a container, particularly when we talk about microservices. This is why Kubernetes supports CPU fractions. While you can enter fractions of the CPU as decimals — for example, 0.5 of a CPU — Kubernetes uses the “millicpu” notation, where 1,000 millicpu (or 1,000m) equals 1 CPU unit.

When we submit a request for a CPU unit, or a fraction of it, the Kubernetes scheduler will use this value to find a node within a cluster that the Pod can run on. For instance, if a Pod contains a single container with a CPU request of 1 CPU, the scheduler will ensure the node it places this Pod on has 1 CPU resource free. For a Docker container, Kubernetes uses the CPU share constraint to proportion the CPU.

If we specify a limit, Kubernetes will try to set the container’s upper CPU usage limit. As mentioned earlier, this is not a hard limit, and a container may or may not exceed this limit depending on the containerization technology. For a Docker container, Kubernetes uses the CPU period constraint to set the upper bounds of CPU usage. This allows Docker to restrict the percentage of runtime over 100 milliseconds the container can use.

Below is a simple example of a Pod configuration YAML file with a CPU request of 0.5 units and a CPU limit of 1.5 units.

				
					apiVersion: v1
kind: Pod
metadata:
  name: cpu-request-limit-example
spec:
  containers:
  - name: cpu-request-limit-container
    image: images.example/app-image
    resources:
      requests:
        cpu: "500m"
      limits:
        cpu: "1500m"


This configuration defines a single container called “cpu-request-limit-container” with the image limits specified in the resources section. In that section, we specify our requests and limits. In this case, we are requesting 500 millicpu (0.5 or 50% of a CPU unit) and limiting the container to 1500 millicpu (1.5 or 150% of a CPU unit).

Setting memory requests and limits

Memory requests and limits are measured in bytes, with some standard short codes to specify larger amounts, such as Kilobytes (K) or 1,000 bytes, Megabytes (M) or 1,000,000 bytes, and Gigabytes (G) or 1,000,000,000 bytes. There is also power of 2 versions of these shortcuts. For example, Ki (1,024 bytes), Mi, and Gi. Unlike CPU units, there are no fractions for memory as the smallest unit is a byte.

The Kubernetes scheduler uses memory requests to find a node within your cluster that has enough memory for the Pod to run on. Memory limits work in a similar way to CPU limits except they are enforced in a more strict manner. If a container exceeds a memory limit, it might be terminated and potentially restarted with an “out of memory” error.

The simple example of a Pod configuration YAML file below contains a memory request of 256 megabytes and a memory limit of 512 megabytes.

				
					apiVersion: v1
kind: Pod
metadata:
  name: memory-request-limit-example
spec:
  containers:
  - name: memory-request-limit-container
    image: images.example/app-image
    resources:
     requests:
       memory: "256M"
     limits:
       memory: "512M"


This configuration defines a single container called “memory-request-limit-container” with the image limits specified in the resources section. We have specified the memory request of 256M, and we’ve limited the container to 512M.

Setting limits via namespaces

If you have several developers, or teams of developers, working within the same large Kubernetes cluster, a good practice is to set common resource requirements to ensure resources are not consumed inadvertently. With Kubernetes, you can define the different namespaces for teams and use Resource Quotas to enforce quotas on these namespaces.

For instance, you may have a Kubernetes cluster that has 64 CPU units and 256 Gigabytes of RAM spread over eight nodes. You might create three namespaces — one for each of your development teams — with the resource quota of 10 CPU units and 80 Gigabytes of memory. This would allow each development team to create any number of Pods up to that limit, with some CPU and memory left in reserve.

For more information on specifying resource quotas for namespaces, refer to the Resource Quotas section of the Kubernetes documentation.

The importance of monitoring Kubernetes

Setting requests and limits on both containers and namespaces can go a long way to ensure your Kubernetes cluster does not run out of resources. Monitoring, however, still plays an important role in maintaining the health of individual services, as well as the overall health of your cluster.

When you have large clusters with many services running within Kubernetes pods, health and error monitoring can be difficult. The New Relic platform offers an easy way to monitor your Kubernetes cluster and the services running within it. It helps you make sure that requests and limits you are setting at the container and across the cluster are appropriate.

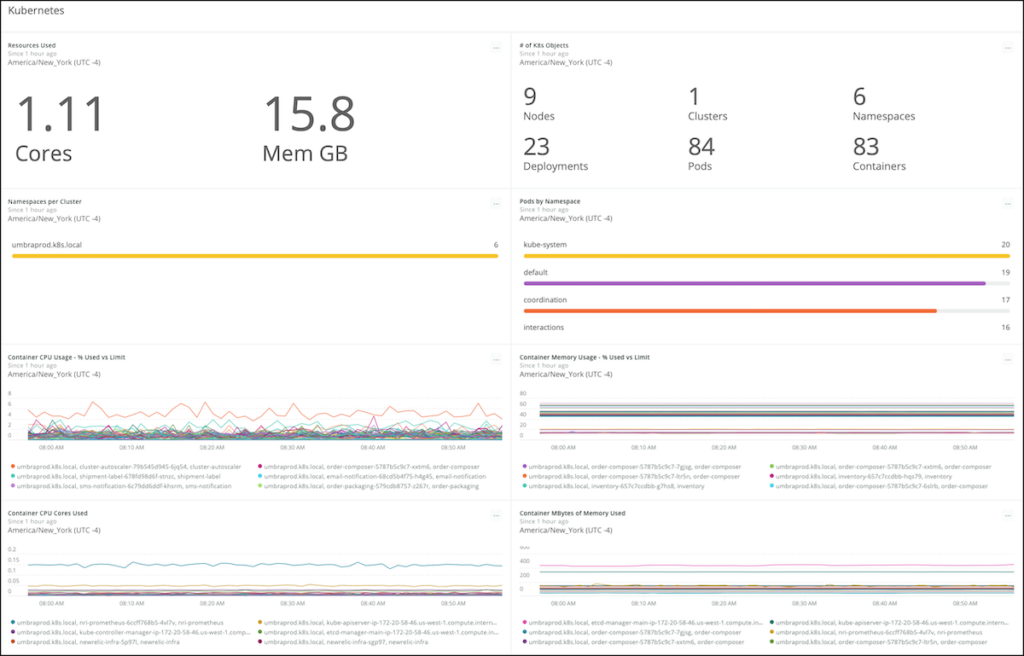
Kubernetes dashboard provides an overview of your Kubernetes platform health

Having a good understanding of how Kubernetes handles CPU and memory resources, as well as enabling configuration to manage these resources, is critical to ensure your Kubernetes clusters have enough capacity at all times. As we’ve seen, setting CPU and memory requests and limits is easy—and now you know how to do it. By adding a layer of monitoring, you will go a long way to ensuring that Pods are not fighting for resources on your cluster.

This article was originally posted on New Relic’s blog.

If you’re interested in developing expert technical content that performs, let’s have a conversation today.

Facebook
Twitter
LinkedIn
Reddit
Email

POST INFORMATION

If you work in a tech space and aren’t sure if we cover you, hit the button below to get in touch with us. Tell us a little about your content goals or your project, and we’ll reach back within 2 business days. 

Share via
Copy link
Powered by Social Snap