This article demonstrates how to set up Conjur to automatically populate Kubernetes Secrets with secrets stored in Conjur using the CyberArk Secrets Provider for Kubernetes. There are two ways to set up the Secrets Provider for Kubernetes. We can use:
- An Init container, in which case the Secrets Provider for Kubernetes is deployed in the same pod as the application. It can only provide secrets to the application in the pod.
- An application container, in which case the Secrets Provider for Kubernetes is deployed in its pod in a namespace and can provide secrets for all applications and pods in the same namespace.
The first few steps for both ways are the same but diverge later in the process. For this article, we’ll begin by reviewing the common steps, then branch into the two different procedures.
Our Tutorial Scenario
Let’s suppose our application connects to a database (DB). The connection string to that database consists of the DB name, username, and password. The DB name is relatively low risk, but we want to secure the username and password in Conjur. Let’s go through the steps of how to do this.
Prerequisites
Before we begin, we need to have a Kubernetes cluster running with a service account for our application and a terminal with all the necessary tools for the init container. We also need the Kubernetes Authenticator configured and enabled. For more information on how to do this, refer to the previous articles or review the official documentation on Enable Authenticators for Applications.
Common Setup
The common setup to both methods previously mentioned involves:
- Defining the application as a Conjur host policy
- Defining and granting access to secrets
- Mapping Conjur variables to Kubernetes Secrets
- Binding the cluster role to a Kubernetes service account
After these steps, the setup splits into a procedure for the Init container and a procedure for the application container.
These steps need to be performed by two roles, the Conjur admin and the application developer. The Conjur admin has administration rights in Conjur and the right to view the actual values of the secrets. The application developer is responsible for the deployment and maintenance of the application but does not need the rights to view the values of the secrets.
The Conjur admin needs to perform the first three steps listed above. Then, the application developer takes over and finalizes the setup with some input from the Conjur admin on how to reference the Conjur environment correctly.
Defining the Application as a Conjur Host Policy
In a previous article, Setting Up the Conjur Kubernetes Authenticator , we set up user roles and groups that we reuse here.
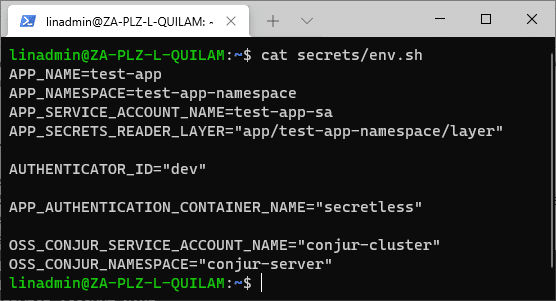
Let’s start by defining an environment shell file to hold all our environment variables, as follows:
secrets/env.sh
					APP_NAME=test-app
APP_NAMESPACE=test-app-namespace
APP_SERVICE_ACCOUNT_NAME=test-app-sa

AUTHENTICATOR_ID="dev"

APP_AUTHENTICATION_CONTAINER_NAME="secretless"

OSS_CONJUR_SERVICE_ACCOUNT_NAME="conjur-cluster"
OSS_CONJUR_NAMESPACE="conjur-server"
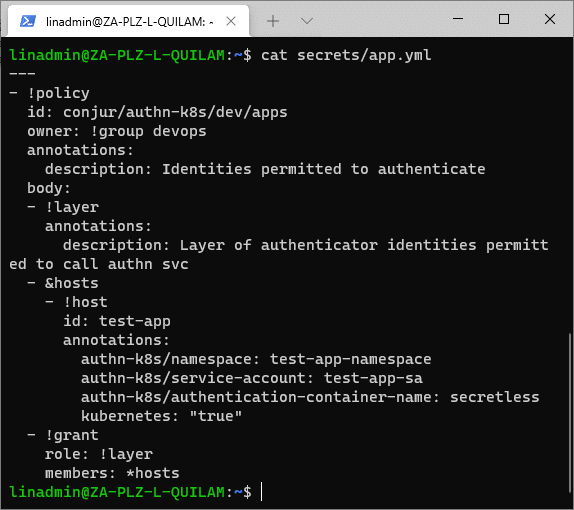
Now we generate the policy file, secrets/app.yml, in the secrets directory. It adds our application to Conjur.
					. ./secrets/env.sh
cat << EOL > ./secrets/app.yml
---
- !policy
  id: conjur/authn-k8s/${AUTHENTICATOR_ID}/apps
  owner: !group devops
  annotations:
    description: Identities permitted to authenticate
  body:
  - !layer
    annotations:
      description: Layer of authenticator identities permitted to call authn svc
  - &hosts
    - !host
      id: ${APP_NAME}
      annotations:
        authn-k8s/namespace: ${APP_NAMESPACE}
        authn-k8s/service-account: ${APP_SERVICE_ACCOUNT_NAME}
        authn-k8s/authentication-container-name: ${APP_AUTHENTICATION_CONTAINER_NAME}
        kubernetes: "true"
  - !grant
    role: !layer
    members: *hosts
EOL
We can review the script using the following code:
cat secrets/app.yml
Once we have confirmation that our script was generated correctly, we load it.
conjur policy load root /root/secrets/app.yml
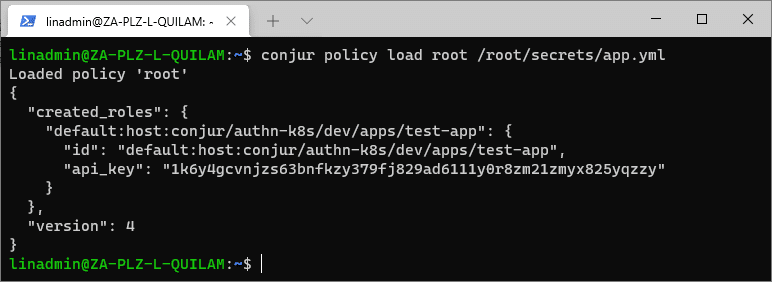
This permits Conjur to authenticate our test-app using the dev Kubernetes Authenticator.
Defining and Granting Access to Secrets
Now we can define our secrets using variables. Since we expose the values of secrets, this has to be performed by the Conjur admin.
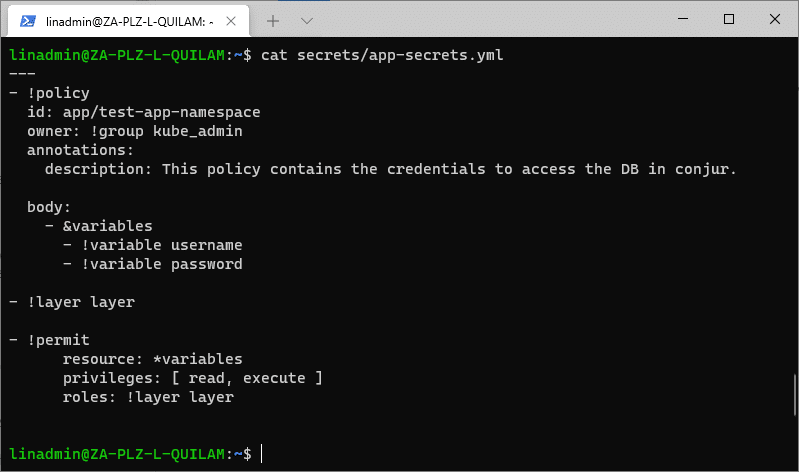
Let’s create a policy for the username and password variables.
					. ./secrets/env.sh
cat << EOL > ./secrets/app-secrets.yml
---
- !policy
  id: app/${APP_NAMESPACE}
  owner: !group kube_admin
  annotations:
    description: This policy contains the credentials to access the DB in conjur.

  body:
    - &variables
      - !variable username
      - !variable password

- !layer layer

- !permit
      resource: *variables
      privileges: [ read, execute ]
      roles: !layer layer


EOL
Load the policy into Conjur.
conjur policy load root /root/secrets/app-secrets.yml
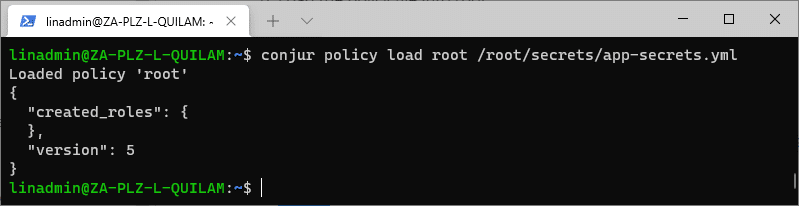
Confirm that we successfully added our variables by executing:
conjur list
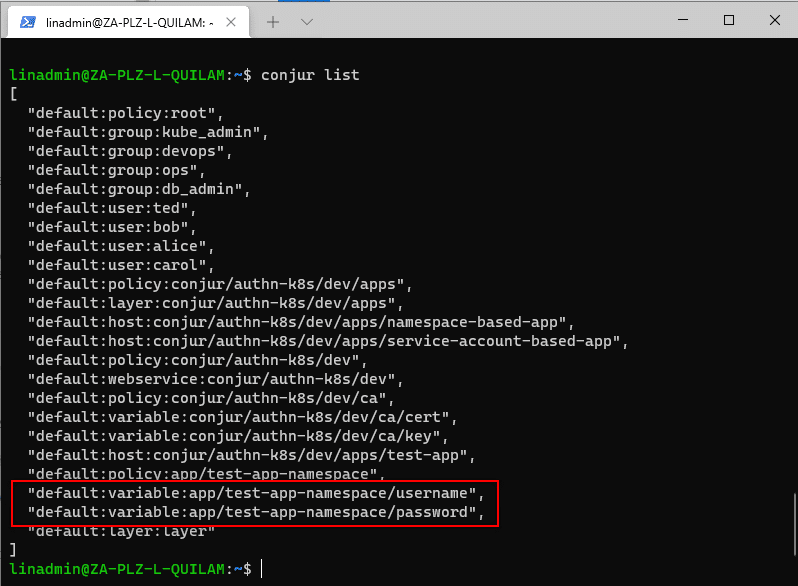
myUser as the username and MyP@ssw0rd1 as the password. Our database name is myappDB, but since we decided that we don’t need to add it to Conjur, we leave it as is.
					conjur variable values add app/test-app-namespace/username “myUser”
conjur variable values add app/test-app-namespace/password “MyP@ssw0rd1”

Mapping Conjur Variables to Kubernetes Secrets
From this point on, the application developer takes over to finalize the setup for the application, and the Conjur admin only provides necessary information, such as the public certificate and public URL for the Conjur environment. We modify the original secrets files used to load the secrets in Kubernetes to reference the Conjur variable names instead of actual values. So, if the policy below is our original secrets file in Kubernetes, we use this command:Db-credentials.yml
					---
apiVersion: v1
kind: Secret
metadata:
  name: db-credentials
  annotations:
    kubernetes.io/service-account.name: "test-app-sa"
type: Opaque
data:
  DBName:   bXlhcHBEQg==
  username: dGhlLXVzZXItbmFtZQ==
  password: dGhlLXBhc3N3b3Jk
This swaps the username and password with a map to the variables, as shown below.
					---
apiVersion: v1
kind: Secret
metadata:
  name: db-credentials
type: Opaque
data:
  DBName:  bXlhcHBEQg==
stringData:
  conjur-map: |-
    username: app/test-app-namespace/username
    password: app/test-app-namespace/password
conjur-map specifies Conjur variables instead of actual values. Note that secrets stored in Kubernetes are in base64 encoding. Policies applied with text values generate an error stating that the values can’t be decoded.
Next, we apply our new secrets/db-credentials.yml file to Kubernetes.
kubectl apply -f secrets/db-credentials.yml

Our updates are applied to Kubernetes, which now uses our mapping instead of trying to decode the base64 value.
Binding a Cluster Role to a Kubernetes Service Account
Kubernetes will not decode the secrets, but it cannot handle the values yet. So, we must bind our Conjur Service Account to our Cluster Authenticator role. These values were created during the setup and configuration of the Conjur Kubernetes Authenticator. This was covered in the previous article, Setting Up the Conjur Kubernetes Authenticator .
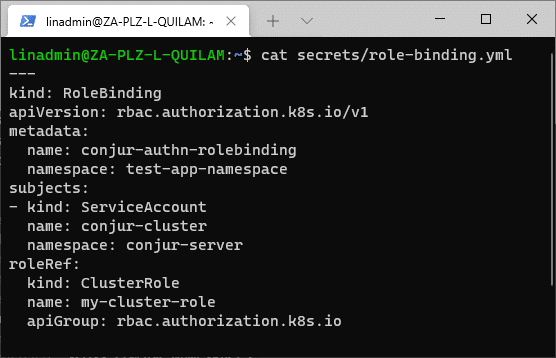
Let’s generate the file for binding to our test-app-namespace.
					. ./secrets/env.sh
cat << EOL > ./secrets/role-binding.yml
---
kind: RoleBinding
apiVersion: rbac.authorization.k8s.io/v1
metadata:
  name: conjur-authn-rolebinding
  namespace: ${APP_NAMESPACE}
subjects:
- kind: ServiceAccount
  name: ${OSS_CONJUR_SERVICE_ACCOUNT_NAME}
  namespace: ${OSS_CONJUR_NAMESPACE}
roleRef:
  kind: ClusterRole
  name: my-cluster-role
  apiGroup: rbac.authorization.k8s.io

EOL
Now, we apply it.
kubectl apply -f secrets/role-binding.yml

One thing to note is that before we applied our role binding, we didn’t touch anything in the Kubernetes cluster. Because all of the configurations are in Conjur, you might have come across a namespace error. This is because the namespace does not exist in Kubernetes yet, and this is the first time we are trying to assign anything to that namespace.
We create the namespace in Kubernetes by creating a secrets/namespace.yml file.
					. ./secrets/env.sh
cat << EOL > ./secrets/namespace.yml
---
apiVersion: v1
kind: Namespace
metadata:
  name: ${APP_NAMESPACE}
EOL
And apply it with:
kubectl apply -f secrets/namespace.yml
Init Container
The setup for the Init container includes:- Creating and binding roles to the application service account
- Setting up a configuration map
- Setting up the application deployment manifest
Creating and Binding Roles to the Application Service Account
We must create a role that is bound to our test-app service account. This allows the Secrets Provider for Kubernetes to update Kubernetes Secrets with values from Conjur variables.secrets/secret-access-role.yml
Load the role manifest into Kubernetes, as follows:
kubectl apply -f secrets/secret-access-role.yml
Setting Up a Configuration Map
To create the configuration map, the Conjur admin must provide the following items to the application developer:
- The Conjur URL, which is a domain name server. In our case, it is https://conjur.demo.com as in the previous article, Setting Up the Conjur Kubernetes Authenticator.
- The Kubernetes Authenticator service ID for the Kubernetes cluster. For us, the value is dev.
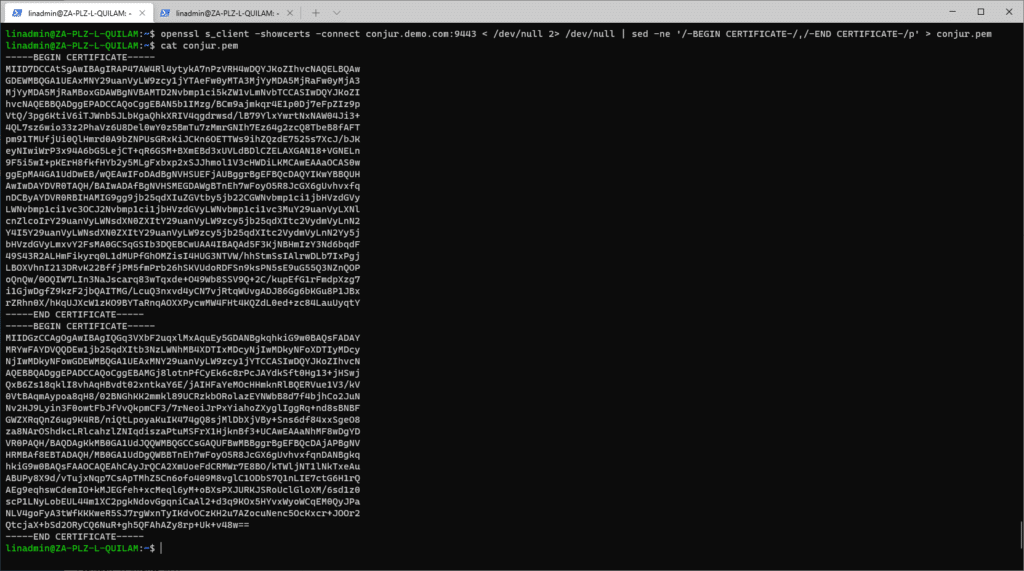
- The public certificate for Conjur, retrieved by the Conjur admin using the following command:
openssl s_client -showcerts -connect conjur.demo.com:9443 < /dev/null 2> /dev/null | sed -ne '/-BEGIN CERTIFICATE-/,/-END CERTIFICATE-/p'
To save the certificate to a file called conjur.pem, append the command with:
> conjur.pem
We now set up the variables that we need with the information provided by the Conjur admin.
					CONJUR_SSL_CERTIFICATE=conjur.pem
CONJUR_APPLIANCE_URL=https://conjur.demo.com:9443
CONJUR_AUTHN_URL=$CONJUR_APPLIANCE_URL/authn-k8s/dev
CONJUR_ACCOUNT=default
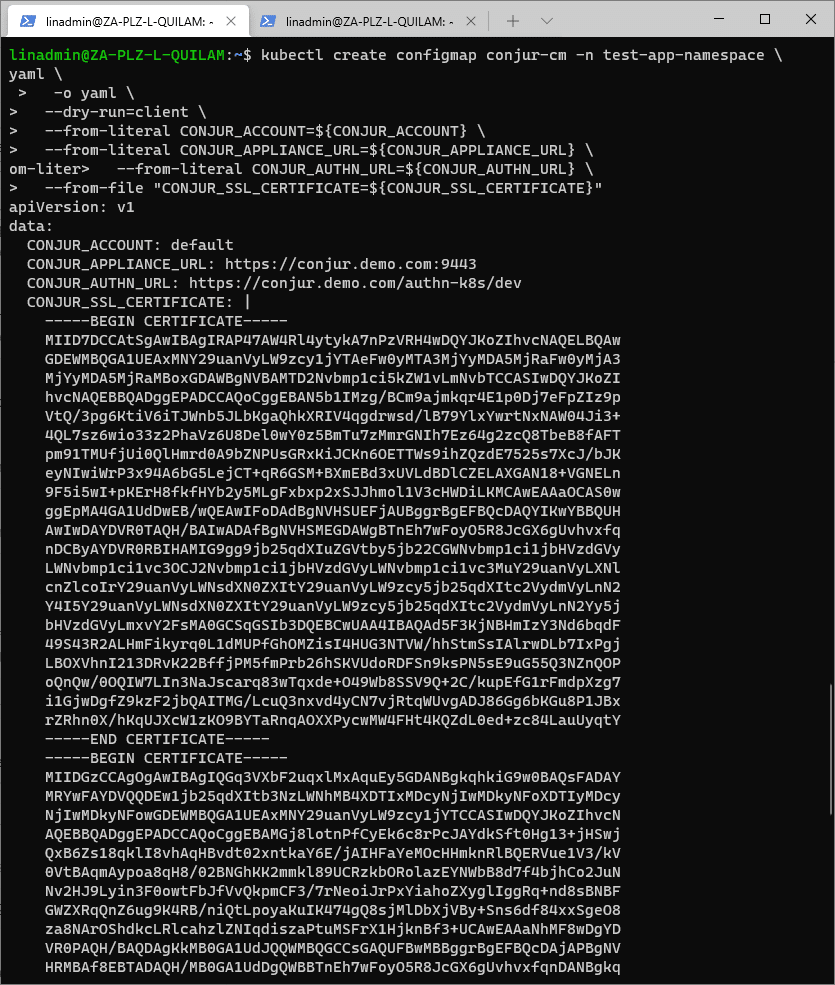
Once all the variables are set, we create the configuration map using those variables. We do a dry run first to ensure the values are correct by executing the following:
					kubectl create configmap conjur-cm -n test-app-namespace \
  -o yaml \
  --dry-run=client \
  --from-literal CONJUR_ACCOUNT=${CONJUR_ACCOUNT} \
  --from-literal CONJUR_APPLIANCE_URL=${CONJUR_APPLIANCE_URL} \
  --from-literal CONJUR_AUTHN_URL=${CONJUR_AUTHN_URL} \
  --from-file "CONJUR_SSL_CERTIFICATE=${CONJUR_SSL_CERTIFICATE}"
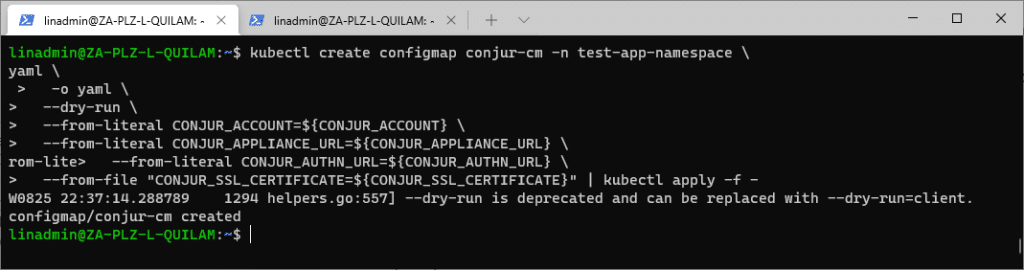
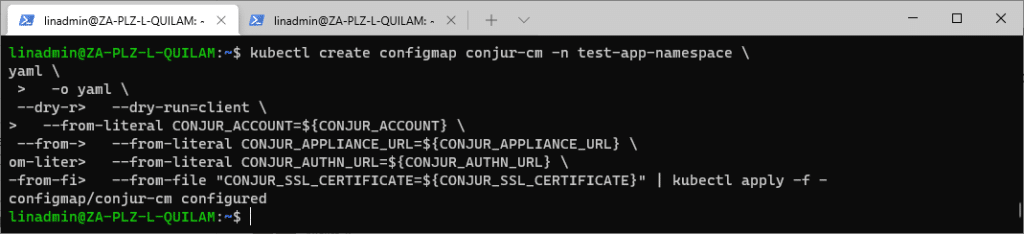
If the values are correct, we execute the command to create and apply the configuration map.
					kubectl create configmap conjur-cm -n test-app-namespace \
  -o yaml \
  --dry-run=client \
  --from-literal CONJUR_ACCOUNT=${CONJUR_ACCOUNT} \
  --from-literal CONJUR_APPLIANCE_URL=${CONJUR_APPLIANCE_URL} \
  --from-literal CONJUR_AUTHN_URL=${CONJUR_AUTHN_URL} \
  --from-file "CONJUR_SSL_CERTIFICATE=${CONJUR_SSL_CERTIFICATE}" | kubectl apply -f -
The command returns a message stating that the configuration map was created. Or, if it already exists, it states that it was configured.
Setting Up the Application Deployment Manifest
The final step is to set up deployment. We do that by creating the following deployment file:
					. ./secrets/env.sh
cat << EOL > ./secrets/deployment.yml
---

apiVersion: apps/v1
kind: Deployment
metadata:
  labels:
    app: ${APP_NAME}
  name: ${APP_NAME}
  namespace: ${APP_NAMESPACE}
spec:
  selector:
    matchLabels:
      app: ${APP_NAME}
  replicas: 1
  template:
    metadata:
      labels:
        app: ${APP_NAME}
    spec:
      serviceAccountName: ${APP_SERVICE_ACCOUNT_NAME}
      containers:
        - name: ${APP_NAME}
          image: myorg/test-app
          ports:
            - containerPort: 8080
          env:
            - name: DB_USERNAME
              valueFrom:
                secretKeyRef:
                  name: db-credentials
                  key: username
            - name: DB_PASSWORD
              valueFrom:
                secretKeyRef:
                  name: db-credentials
                  key: password
      initContainers:
      - image: cyberark/secrets-provider-for-k8s
        imagePullPolicy: Always
        name: cyberark-secrets-provider-for-k8s
        env:
          - name: CONJUR_AUTHN_LOGIN
            value: host/test-app
          - name: CONTAINER_MODE
            value: init
          - name: MY_POD_NAME
            valueFrom:
              fieldRef:
                fieldPath: metadata.name
          - name: MY_POD_NAMESPACE
            valueFrom:
              fieldRef:
                fieldPath: metadata.namespace
          - name: K8S_SECRETS
            value: db-credentials
          - name: SECRETS_DESTINATION
            value: k8s_secrets
        envFrom:
          - configMapRef:
              name: conjur-cm
EOL
Apply the script with the following command:
kubectl apply -f secrets/deployment.yml

Application Container
The setup for the init container includes:- Configuring the Secrets Provider using a Helm chart
- Deploying the Secrets Provider for Kubernetes using a Helm chart
Configuring the Secrets Provider Using a Helm Chart
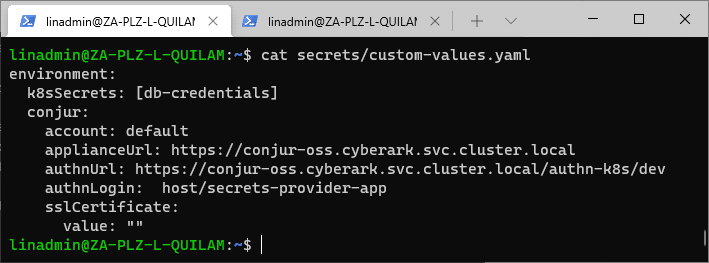
To set up the Secrets Provider as a separate application container, we generate a custom-values.yaml file that applies mandatory configuration values. These are replacement values for the default values in the values.yaml file provided by a Helm chart.Custom-values.yaml
					cat << EOL > ./secrets/custom-values.yaml
environment:
  k8sSecrets: [db-credentials]
  conjur:
    account: default
    applianceUrl: https://conjur-oss.cyberark.svc.cluster.local
    authnUrl: https://conjur-oss.cyberark.svc.cluster.local/authn-k8s/dev
    authnLogin:  host/secrets-provider-app
    sslCertificate:
      value: ""
EOL
We must be sure that we save the file in the same location in which we deploy the Secrets Provider using a Helm chart.
Deploying the Secrets Provider for Kubernetes Using a Helm Chart
We export the Conjur public certificate and save it to a file called conjur.pem. This is the same as in the Init container setup.
openssl s_client -showcerts -connect conjur.demo.com:9443 < /dev/null 2> /dev/null | sed -ne '/-BEGIN CERTIFICATE-/,/-END CERTIFICATE-/p' > conjur.pem
Next, we access the Secrets Provider Helm chart in CyberArk’s Helm-Chart repository. This step was performed in the Article Setting Up the Conjur Kubernetes Authenticator,
helm repo add cyberark https://cyberark.github.io/helm-charts

Once the Helm-Chart repo named cyberark is in place, we can install the secrets provider.
helm install secrets-provider cyberark/secrets-provider -f secrets/custom-values.yaml --set-file environment.conjur.sslCertificate.value=conjur.pem -n test-app-namespace
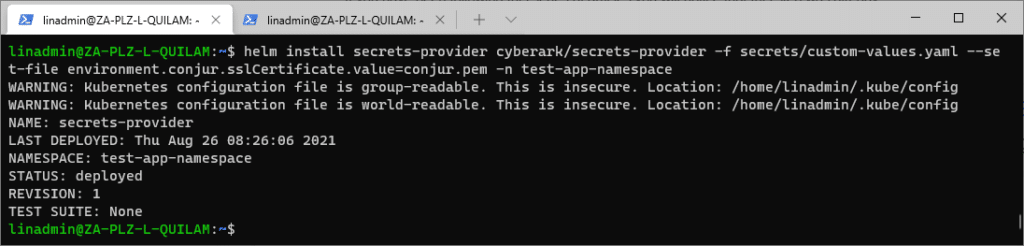
When our resources are ready, the Secrets Provider job starts. Our application can now consume Kubernetes Secrets.
Limitation
A limitation that we must take note of is that the Secrets Provider is limited to fetching up to 50 Conjur secrets with an average of 100 characters in length for the variable paths.
Conclusion
Should you run into any trouble, check out CyberArk’s Troubleshooting page to enable logs and diagnose common issues.
For more information on the init container, check out Secrets Provider for Kubernetes – Init Container.
For more information about the application container, be sure to check out Secrets Provider for Kubernetes – Application Container.
If you’re interested in developing expert technical content that performs, let’s have a conversation today.