Tutorial Prerequisites
You need the following tools to follow this tutorial:- AWS SageMaker
- SageMaker notebooks
- Detectron2
- PyTorch
Creating a SageMaker Studio Notebook
First, log in to your AWS account from the AWS management console. Search for and click SageMaker in the Services tab: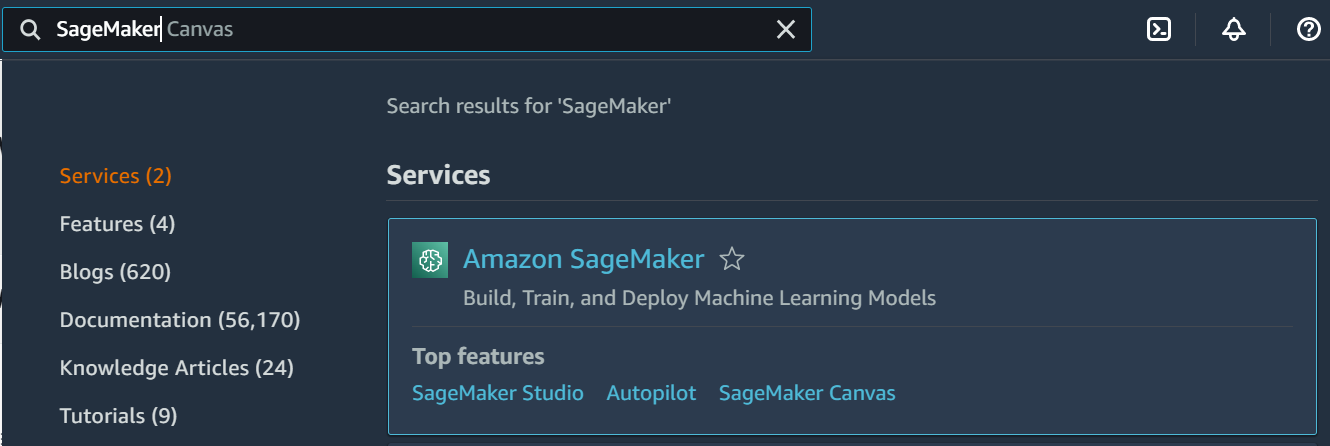
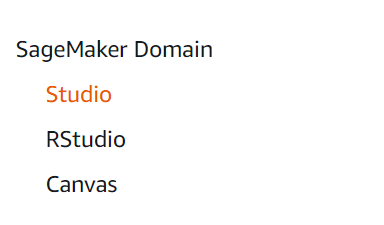
Then, on the left tab, under SageMaker Domain, click Studio:
Note: SageMaker Studio uses AWS Identity and Access Management (IAM) policies with attribute-based access control. This approach completely isolates resources within different machine learning teams. In this manner, user A can only access resources needed for project A.
The first time you use SageMaker Studio, you’ll need to do a bit of setup:
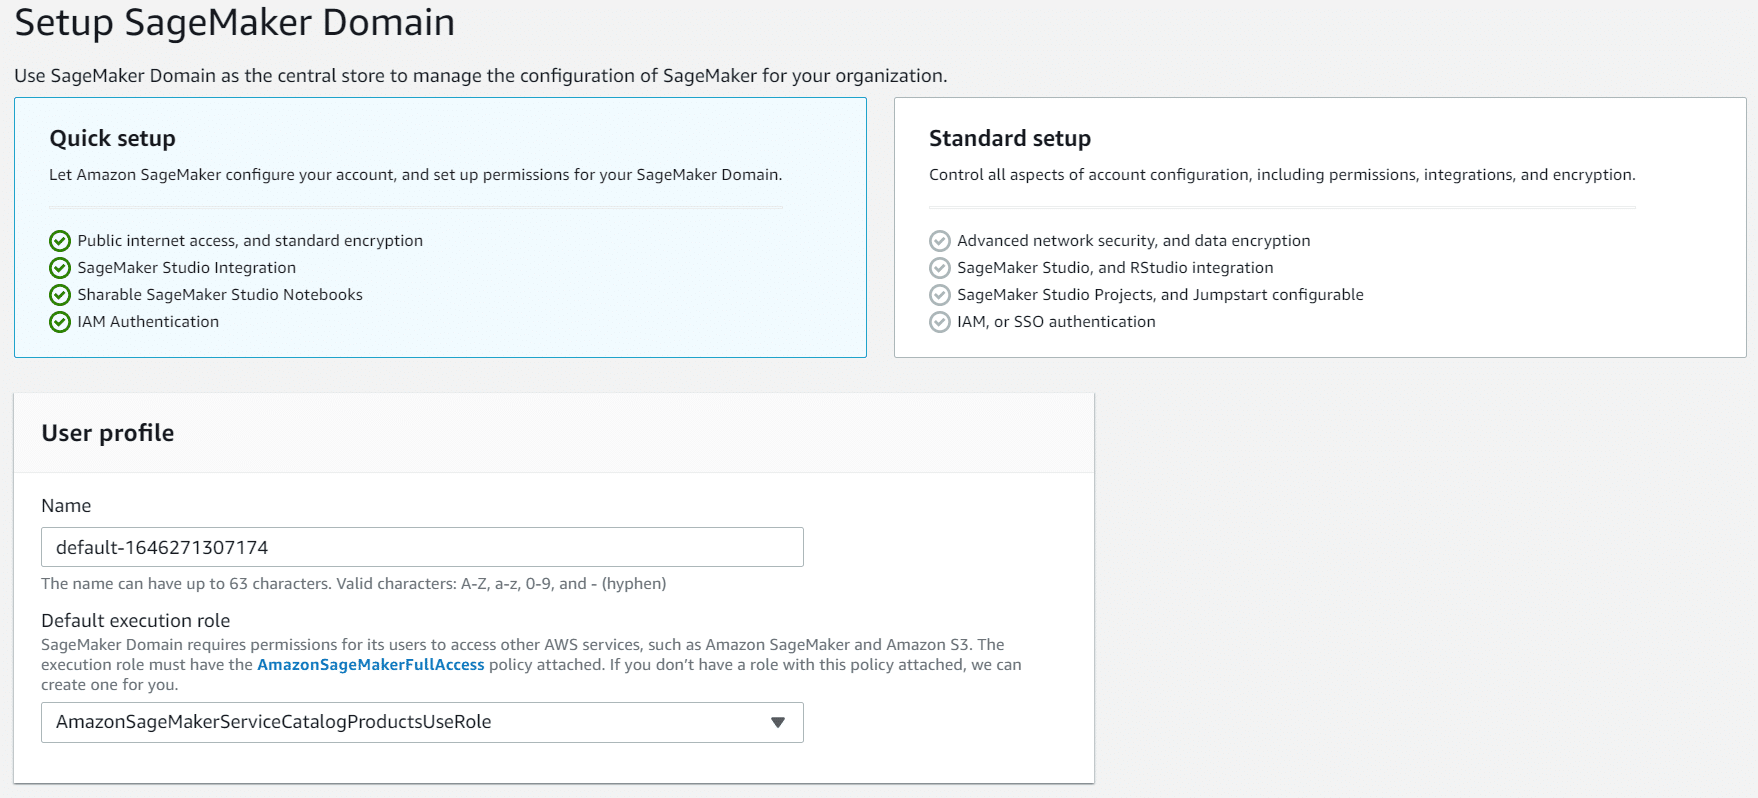
Use the Quick Setup option unless you know you need more advanced configuration options.
Next, enter a name and default execution role for your SageMaker domain. This default role must have the AmazonSageMakerFullAccess policy attached to make calls to other services like S3 and SageMaker.
Select a role from the dropdown menu next. If you already have a role with the correct policy, you can use it. Otherwise, create a new role.
Then, click Next to continue. It will take SageMaker a few minutes to create the domain. When it’s done, from the right of the newly-created user in the Users section, click Launch app:
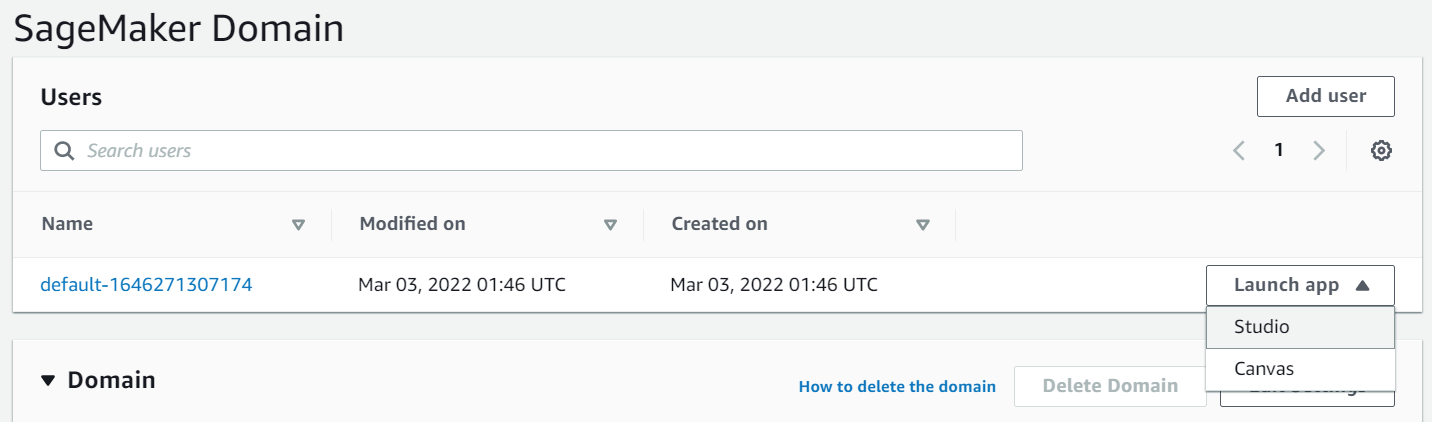
Then, click Studio to launch a new Jupyter notebook. Finally, select the Base Python 3.6 environment for the notebook.
Setting Up Detectron2 on AWS SageMaker
Now that you’ve created a SageMaker Studio notebook, enter all the code to install Detectron2 along with the dependencies to use it. Create a new code cell in your Studio Notebook for each block of code shown below and run the cell as soon as you type or paste the code into it.
Start by creating and activating a virtual environment. This approach isolates your Python working environment and prevents other packages and installations from interfering.
					!python -m venv env
!source env/bin/activate
Next, install a few dependencies for PyTorch and OpenCV. Then, update and install the latest PyTorch version, along with torchvision, which Detectron2 needs.
					!apt-get update
!apt-get install ffmpeg libsm6 libxext6  -y
!pip install torch==1.10.0+cpu torchvision==0.11.1+cpu -f https://download.pytorch.org/whl/cpu/torch_stable.html
Install OpenCV, an open-source software library that enables machine learning engineers and developers to build computer vision and machine learning applications.
!pip install opencv-python!
Then, install Detectron2:
python -m pip install detectron2 -f https://dl.fbaipublicfiles.com/detectron2/wheels/cpu/torch1.10/index.html
Note that you’re installing the CPU-only versions of PyTorch and Detectron2. These versions offer GPU-enabled versions with faster performance. While you’d certainly want to use GPU inference to serve up Detectron2 at scale, Detectron2’s CPU-only performance is quite good. There’s no point spending extra money on a GPU-enabled SageMaker Studio Notebook when you’re experimenting with Detectron2 interactively in a notebook.
Next, add the following code to your notebook to import some Detectron2 utilities and libraries.
					     import detectron2
from detectron2.utils.logger import setup_logger
setup_logger()

# import some common detectron2 utilities
from detectron2 import model_zoo
from detectron2.engine import DefaultPredictor
from detectron2.config import get_cfg
from detectron2.utils.visualizer import Visualizer
from detectron2.data import MetadataCatalog, DatasetCatalog
from detectron2.data.datasets import register_coco_instances
#from detectron2.utils.visualizer import ColorMode

from detectron2.engine import DefaultTrainer
from detectron2.config import get_cfg

# import detectron2 inference and dataset catalog tools
from detectron2.data import DatasetCatalog, MetadataCatalog, build_detection_test_loader
from detectron2.evaluation import COCOEvaluator, inference_on_dataset

# import some common libraries
import cv2
import os
import torch
import torchvision
Running a Pre-Trained Model
Now that you’ve installed Detectron2 and its dependencies, it’s time to use it. Detectron2 comes with its own Model Zoo containing many pre-trained models. Let’s use one here to demonstrate how Detectron2 works.
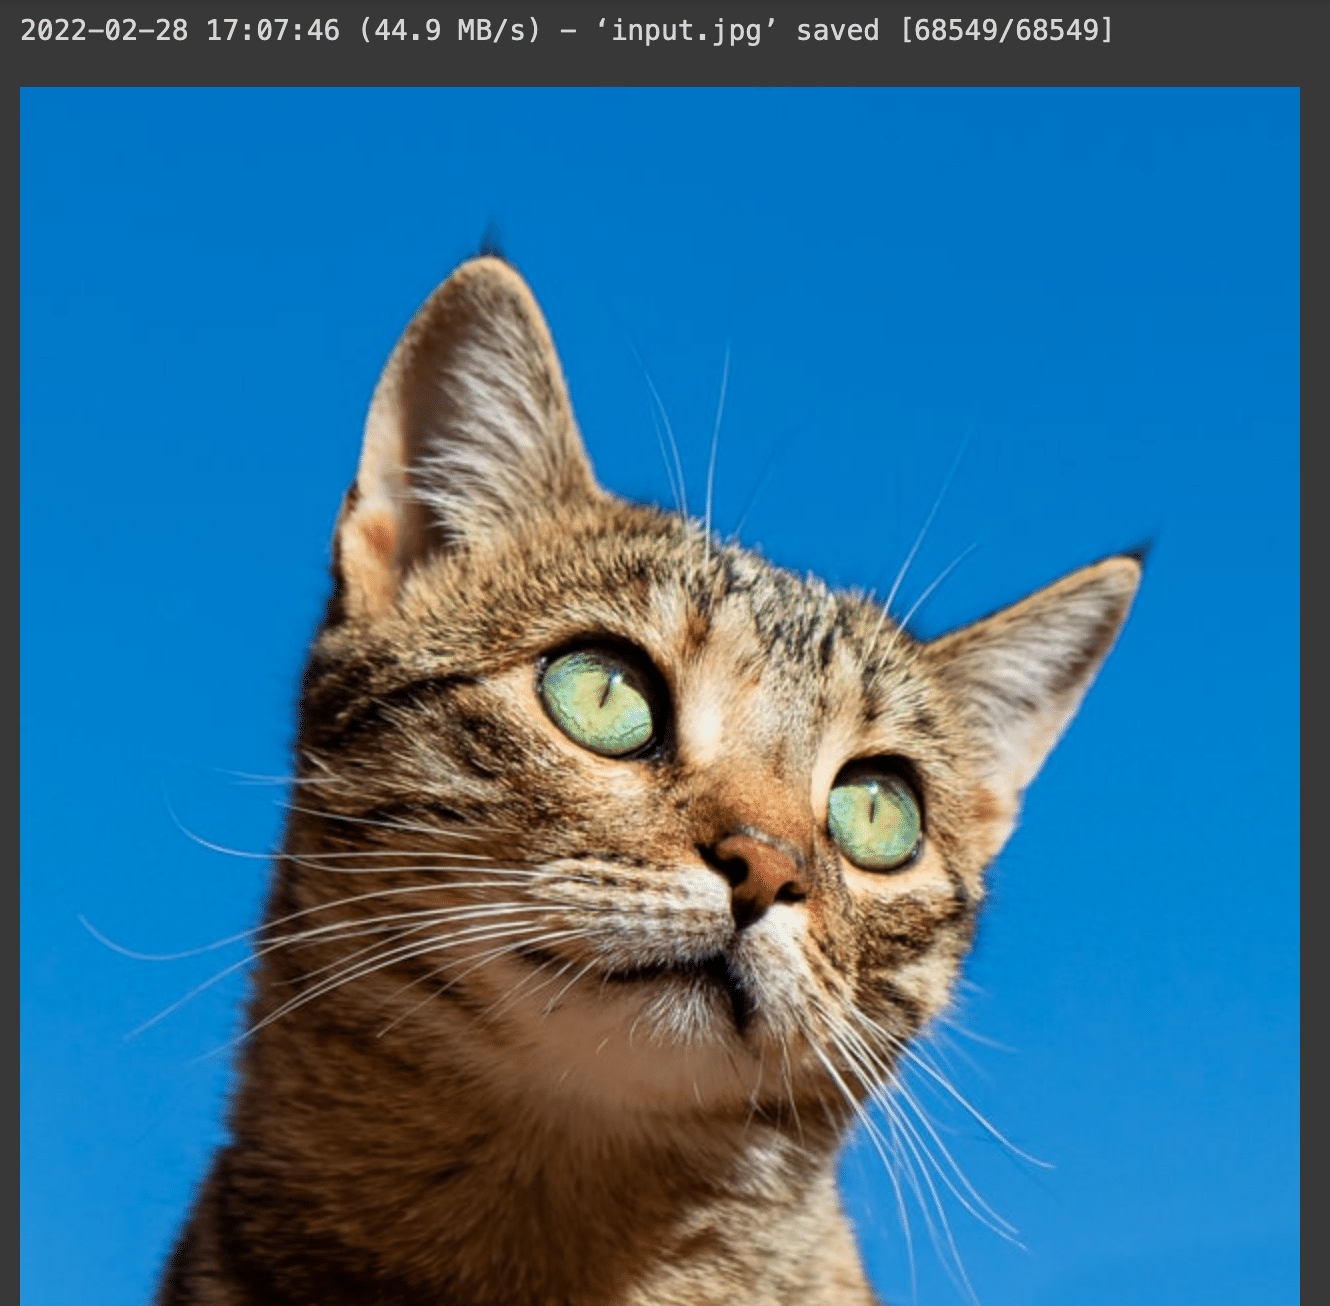
You need an image to test Detectron2. So, pull a freely-licensed image from the Internet:
					!wget "https://unsplash.com/photos/IrQmtib-ER4/download?force=true&w=640"-q -O input.jpg
im = cv2.imread("input.jpg")
Image.fromarray(cv2.cvtColor(im, cv2.COLOR_BGR2RGB))
Running this code should download and display an image of a cat.
Next, create a detectron2config.
A defaultPredictor acts as a wrapper to help developers and ML engineers run an inference with an existing model. The DefaultPredictor has model loading and preprocessing and works on single images rather than batches, so it’s a perfect fit for your notebook.
					cfg = get_cfg()
# add project-specific config (e.g., TensorMask) here if you're not running a model in detectron2's core library
cfg.merge_from_file(model_zoo.get_config_file("COCO-InstanceSegmentation/mask_rcnn_R_50_FPN_3x.yaml"))
Next, set a threshold to filter out low-scoring bounding boxes that the model’s inference-testing component predicts.
cfg.MODEL.ROI_HEADS.SCORE_THRESH_TEST = 0.5 # set threshold for this model to filter low-scoring bounding boxes
Then, download the model from the Detectron2 model zoo and create a detectron2 DefaultPredictor to run inference on the downloaded image.
cfg.MODEL.WEIGHTS = model_zoo.get_checkpoint_url("COCO-InstanceSegmentation/mask_rcnn_R_50_FPN_3x.yaml")
# you can omit the next line if running a GPU build of PyTorch and Detectron
cfg.MODEL.DEVICE = 'cpu'
predictor = DefaultPredictor(cfg)
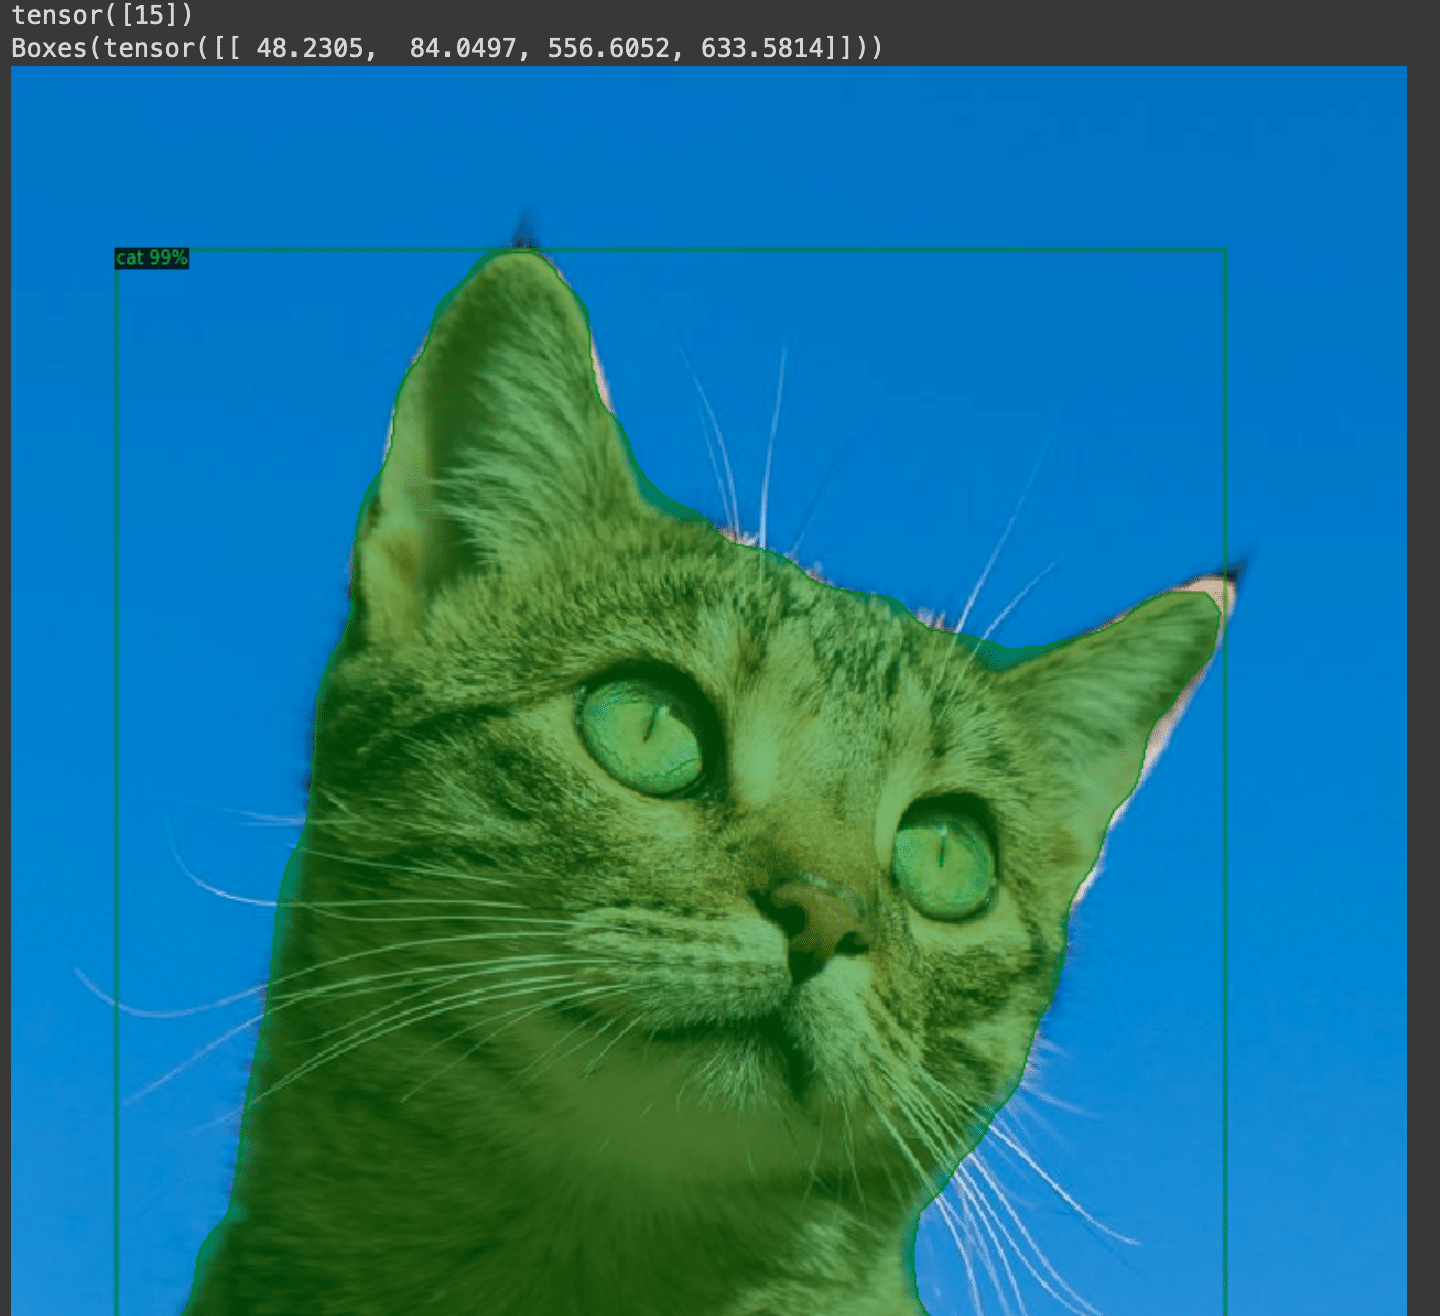
outputs = predictor(im)
Print the DefaultPredictor outputs to the console:
					print(outputs["instances"].pred_classes)
print(outputs["instances"].pred_boxes)
These outputs represent the bounding boxes of any objects the model detected in your image. You’ll get the following output from your cat test image:

					v = Visualizer(im[:, :, ::-1], MetadataCatalog.get(cfg.DATASETS.TRAIN[0]), scale=1.2)
out = v.draw_instance_predictions(outputs["instances"].to("cpu"))
cv2_imshow(out.get_image()[:, :, ::-1])
When you run this code, Detectron2 will highlight the cat and draws its bounding box:
Conclusion
Thanks to Detectron2 and pre-trained models, it’s easy for developers and machine learning engineers to incorporate powerful object detection capabilities into their applications.
However, many organizations need to write and fine-tune models to ensure accuracy and service their customer needs. Deploying models in production can be a challenge, as well. The following article will demonstrate how to fine-tune Detectron2 and deploy it to a SageMaker endpoint.
You might decide, though, that you’d prefer to focus on your core competencies and work with a partner who specializes in AWS and machine learning. If that sounds good, Mission could be the managed cloud service provider you’re seeking.
Mission can handle the complex aspects of building out your machine learning architecture on AWS so you can stay laser-focused on your customers’ needs. Read more about how Mission helps organizations fulfill their data, analytics, and machine learning goals on AWS.
If you’re interested in developing expert technical content that performs, let’s have a conversation today.