At the enterprise level, x.509 certificates power many user-, device-, and site-authentication processes. In fact, we can provide secure access to infrastructure, including databases, using short-lived x.509 certificates over TLS/SSL traffic.
This article describes how to easily configure x.509 certificate authentication for MongoDB.
Configuring x.509 Certificates for MongoDB
We’ll demonstrate x.509 authentication for a self-hosted MongoDB. The client side consists of an Ubuntu- or Debian-based computer running MongoDB while the server side features a password-protected, DNS-enabled virtual machine (VM) also running MongoDB. Note that this walkthrough uses AWS, so it includes values specific to AWS instances.
You need this software to follow the tutorial:
- MongoDB version 4.4 or newer
- MongoDB Compass version 1.1.9 or newer
- OpenSSL version 1.1.1f or newer
Setting Up the Server Side for using x.509 Certificates
Let’s first generate our x.509 certificates, mongo01.pem and clientCA.crt. These certificates will sit on the server.
To start, create an x509 directory on the VM and generate the server’s certificate authority (CA). Get the VM’s hostname using the -f command and insert it after the common name (CN).
After the hostname, include your country, state, and organizational unit. In this example, we add the United States (US) as our country (C), New York (NY) as our state (ST), and headquarters (HQ) as our organizational unit (OU). Be sure the values you enter are accurate and consistent.
					$ mkdir x509 && cd x509 && hostname -f
$ openssl req -x509 -new -nodes -days 30 -sha256 \
   -subj "/CN=ip-172-31-17-102.us-east-2.compute.internal/C=US/ST=NY/OU=HQ" \
   -keyout serverCA.key -out serverCA.crt
CN field.
					$ openssl req -new -nodes -sha256  -subj "/CN=mongod.k8demo.ml" \
  -out mongo01.csr \
  -keyout mongo01.key
Next, sign with the CA certificate, then concatenate the key and root files.
					$ openssl x509 -req -sha256 -days 30 -in mongo01.csr -CA serverCA.crt \
  -CAkey serverCA.key -CAcreateserial -out mongo01.crt
$ cat mongo01.crt mongo01.key > mongo01.pem
Execute similar commands to create client certificates. For brevity, you can arrange these commands in a shell script, save it as clientcert.sh, and run it.
$ nano clientcert.sh && chmod +x clientcert.sh && ./clientcert.sh
The script’s contents are below. Notice the -subj flag for the CA is exactly the same as the server above:
					#!/bin/sh
# Client CA
openssl req -x509 -new -nodes -days 30 -sha256 \
	-subj "/CN=ip-172-31-17-102.us-east-2.compute.internal/C=US/ST=NY/OU=HQ" \
	-keyout clientCA.key -out clientCA.crt

# Client CSR for local machine or node
openssl req -new -nodes -sha256  -subj "/CN=newuser" \
 -out user.csr -keyout user.key

# Sign Certificate
openssl x509 -req -sha256 -days 30 \
	-in user.csr \
	-CA clientCA.crt \
	-CAkey clientCA.key \
	-CAcreateserial \
	-out user.crt

# concatenate
cat user.crt user.key > user.pem
Now, create a preferred directory and copy the certificates to that directory. Be sure to change certificate ownership to mongodb so the database engine can interpret the files.
					$ mkdir -p /etc/certs
$ sudo cp mongo01.pem clientCA.crt /etc/certs
$ sudo chown -R mongodb:mongodb /etc/certs
Next, log in to MongoDB, then create a username CN=newuser, which you already chose for the client above. Use the $external database, as specified in MongoDB’s documentation. You can include roles as well.
					$ mongo
> 	db.getSiblingDB("$external").runCommand(
  {
	createUser: "CN=newuser",
	roles: [
  	{ role: "readWriteAnyDatabase", db: "admin" }
	]
  }
)
Exit the Mongo session now. Then, go to the mongod.conf config file, change the bindIp to allow remote connections, and include tls for encryption. Then, save, restart, and confirm the mongod status like this:
					$ sudo nano /etc/mongod.conf
net:
  port: 27017
  bindIp: 0.0.0.0
  tls:
	mode: requireTLS
	certificateKeyFile: /etc/certs/mongo01.pem
	CAFile: /etc/certs/clientCA.crt
	disabledProtocols: TLS1_0,TLS1_1

$ sudo systemctl restart mongod && sudo systemctl status mongod
Connecting from the Client-side using x.509 Certificates
On the client machine, we will now attempt a CLI- and GUI-based x.509 authenticated remote connection to the database. Let’s begin by copying the server CA (serverCA.crt) and client pem (user.pem) certificates from the VM to our local machine through secure copy (scp). Once copied, check and change the certificate ownership to your username.
					$ mkdir -p x509/mongo && cd x509/mongo
$ sudo scp ubuntu@ipadress:~/x509/serverCA.crt .
$ sudo scp ubuntu@ipadress:~/x509/user.pem .
Then, we log in to the remote database via our terminal like this:
					mongo --authenticationDatabase '$external' --tls \
--authenticationMechanism MONGODB-X509 \
--tlsCAFile '/fullpath/serverCA.crt' \
--tlsCertificateKeyFile '/fullpath/user.pem' \
--username 'CN=newuser' --host 'mongod.k8demo.ml'
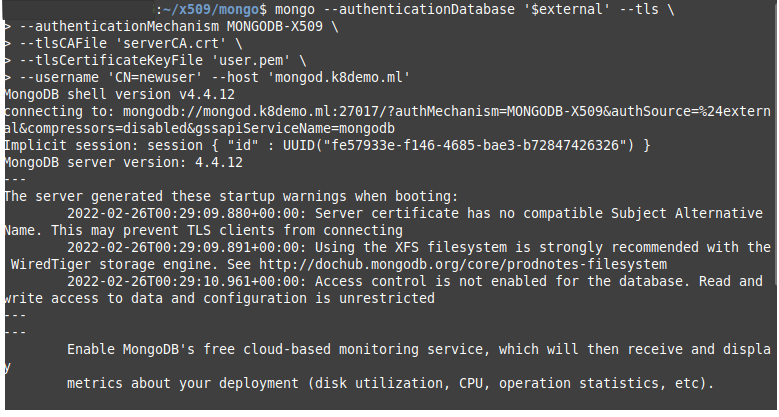
The screenshot above shows that we have connected. You may receive a few typical warnings. You can reduce these warnings using database hardening techniques.
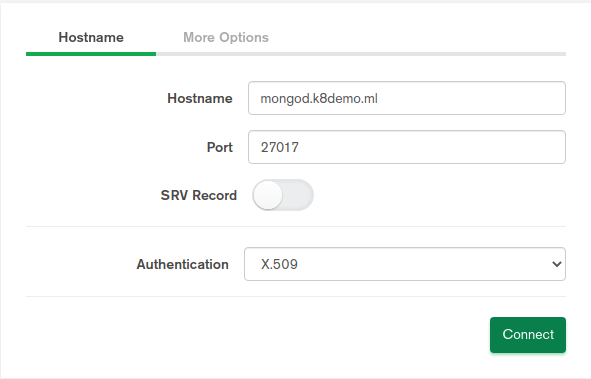
If you prefer to connect via the GUI instead, launch MongoDB Compass. Then, click Fill in connection fields individually. Next, complete the fields in the Hostname with the database hostname, Port (usually 27017), and Authentication (X.509).
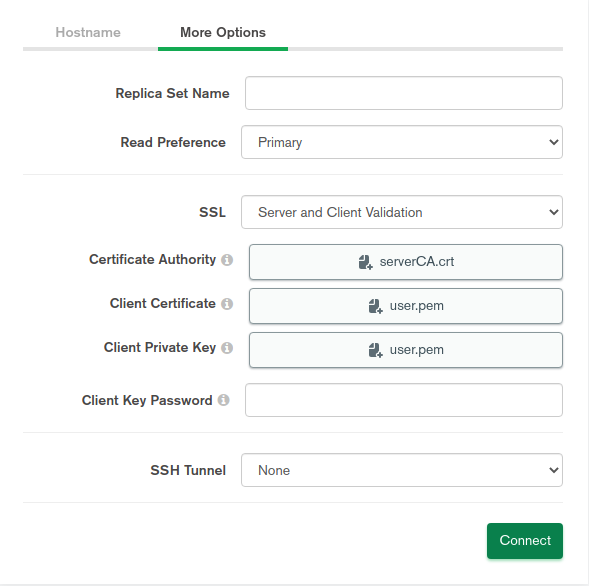
In the More Options tab, skip the replica field if there are no replicas, and select the Primary option in the Read Preference dropdown. This ensures that the first database in the MongoDB URL is the priority. Choose Server and Client Validation in the SSL field for full x.509 authentication. Then, select your certificates. Finally, click Connect to log in with your x.509 certificates.
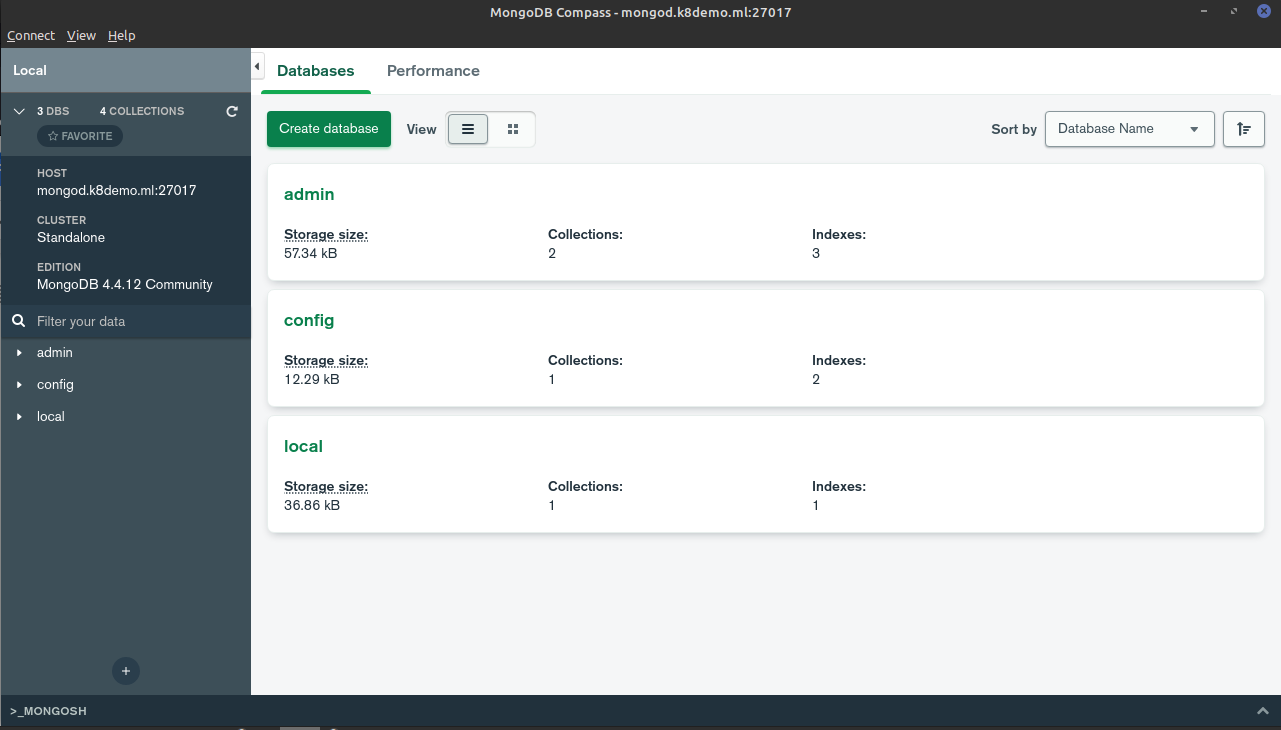
As the screenshot shows, we have successfully logged in using our certificates.
Conclusion
Using x.509 certificates for authentication is preferable to using a traditional username and password. The certificates provide secure access to infrastructure at a complexity that usernames and passwords cannot match.
We can ensure a secure connection and data stream traveling to and from databases using short-lived x.509 certificates over TLS/SSL traffic. Now that you know how, you can implement x.509 authentication for your MongoDB database.
To start securing your database and other infrastructure access using x.509 certificates, learn more about Teleport.
If you’re interested in developing expert technical content that performs, let’s have a conversation today.