Xcode 11 introduces a new way to build user interfaces called SwiftUI.
From https://developer.apple.com/documentation/swiftui:
SwiftUI provides views, controls, and layout structures for declaring your app’s user interface. The framework provides event handlers for delivering taps, gestures, and other types of input to your app, and tools to manage the flow of data from your app’s models down to the views and controls that users will see and interact with.
Many iOS libraries provide views that are UIView subclasses and these must be wrapped before they can be used in a SwiftUI view. This article will describe how to present a TomTom map view in a SwiftUI app. The sample application provided presents one simple use of this view that you can review and explore. Check the comment blocks in the app for details not covered here.
Prerequisites
Xcode 11
First, we’ll need to download and set up a few things. Naturally, if we’re doing iOS development on a Mac, we’ll need to download Xcode. You can find more information on that at https://developer.apple.com/download/. At the time of this writing, Xcode 11 is in beta. It’s the first edition of Xcode that supports SwiftUI, which we’ll be using in this project. Those instructions will lead you to install the iOS 13 beta as well.
TomTom SDK
Next, we’ll need to obtain the TomTom Maps SDK for iOS. We can find that by going to https://developer.tomtom.com/. Before we can use the SDK in an application we’ll need to have an API key and for that, we’ll need a developer account. So the first step here will be to register by clicking the button at the top right.
Fill in the form on the page that appears and click “Register”.
After you register you’ll find that you already have “My New App” on the dashboard. This should be changed to match the name of the app we’re going to build. I’m naming it “SampleiOSApp”.
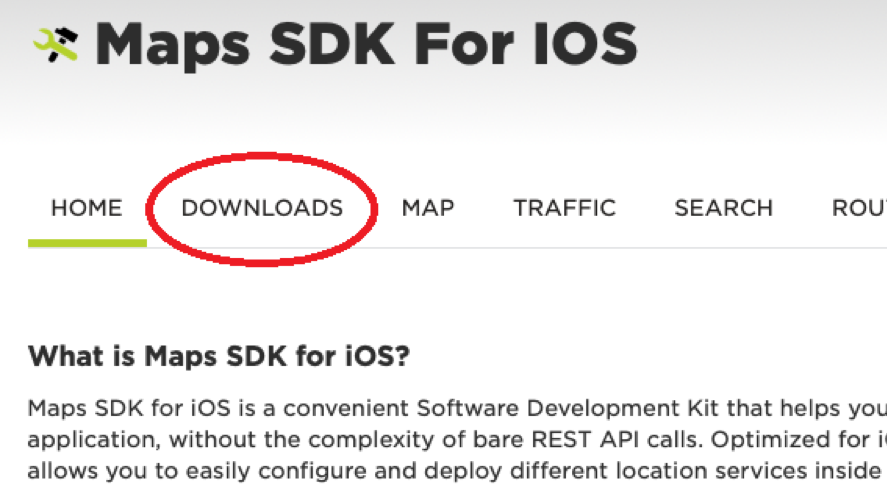
Now we can get the TomTom Maps SDK. We can find this at https://developer.tomtom.com/products/maps-sdk. From the TomTom home page click “Products” and then look for “Maps SDK (Android, iOS, Web). Once you reach the page you may need to scroll down to find the iOS version.
We’re almost ready to create an app with the Maps SDK. The instructions are at the bottom of the screen, but first, we’re going to take care of step two from that list and go to the SDK downloads page.
What’s this? No package to download and set up! Instead, the SDK is accessed via Cocoapods. If you’re not familiar with Cocoapods, it’s a dependency manager for Objective-C and Swift development. It’s similar to npm for Node development, Ruby gems, Nuget for .NET development, and so on.
Cocoapods allows us to create a file called podfile, which will download the SDK and its dependencies. We’ll create and use the podfile in just a few minutes. First, you’ll need to follow the instructions for installing Cocoapods at https://cocoapods.org.
(Hint: $ sudo gem install cocoapods).
Build the App
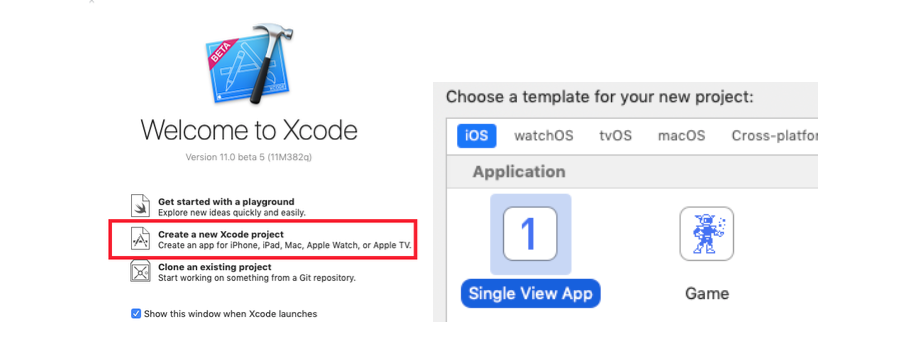
So now that we have Xcode, and we have Cocoapods, we can create the app. Start Xcode, click “Create a new Xcode Project”, and choose the iOS “Single View App” template.
Next, select the features of the app. We’re going to name the project as we did in the TomTom Edit App screen. Also, select Swift as the language and check the use SwiftUI box.

After we click “Next”, Xcode generates the application for us and our new app contains a single view with the traditional “Hello World”. We can go ahead and run the app and view the results in the simulator.
SDK Setup
Before we get into building the UI, we’ll take this opportunity to set up the TomTom Maps SDK. Remember that we mentioned that the SDK is downloaded via Cocoapods. We’ll need to set up a file named “podfile”. This file is used to download or update the application with the latest versions of the libraries. (Note: after we complete the next couple of steps, we’ll be abandoning the project file so we should close it down while we do this.)
To create a pod file we will need the terminal window. Open a terminal window at the folder that contains the xcodeproj file. Enter the following command:
You’ll see a listing of the pods being installed and any dependencies that it finds. If you want to learn more about how Cocoapods works, you can review the instructions at using-cocoapods.
As I mentioned above, the pod setup creates an Xcode workspace and we should now open the workspace instead of the project file.
There’s one last thing we must do before we can actually use the SDK: add the authentication key from the TomTom site into the info.plist file to authorize the app to use the services. We do this in the info.plist file.
When we created our first app on the TomTom developer website, we were given an API key. Go ahead and navigate back to this page, and copy the key.
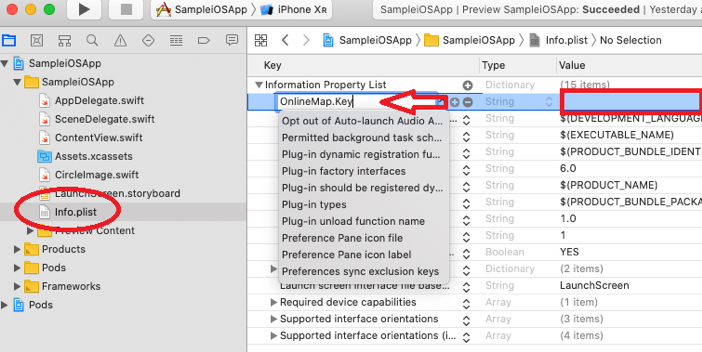
Click info.plist to open it, create a new key called OnlineMap.Key, and paste the API key provided with the application we created on the TomTom website.
SwiftUI
With Xcode 11, iOS 13, and Mac OS 10.15, UI development has become much easier and more flexible. We can define views in code and see the changes in the preview window as we type in some cases. We can affect changes in the preview window, and see the resulting code changes in real-time. The screens will take care of the layout in different sizes and orientations to ensure we see the same thing wherever it shows.
When we create the basic application using the template we see the proto-typical “Hello World” application. We can find the screen contents in the ContentView.swift file as follows:
In the case of the TomTom map, we want to distinguish that it is a UIView rather than a SwiftUI “View,” so we need to provide a class that implements the UIViewRepresentable protocol.
Select “File / New / File” from the main Xcode menu and select the “Swift UI View” from the templates.
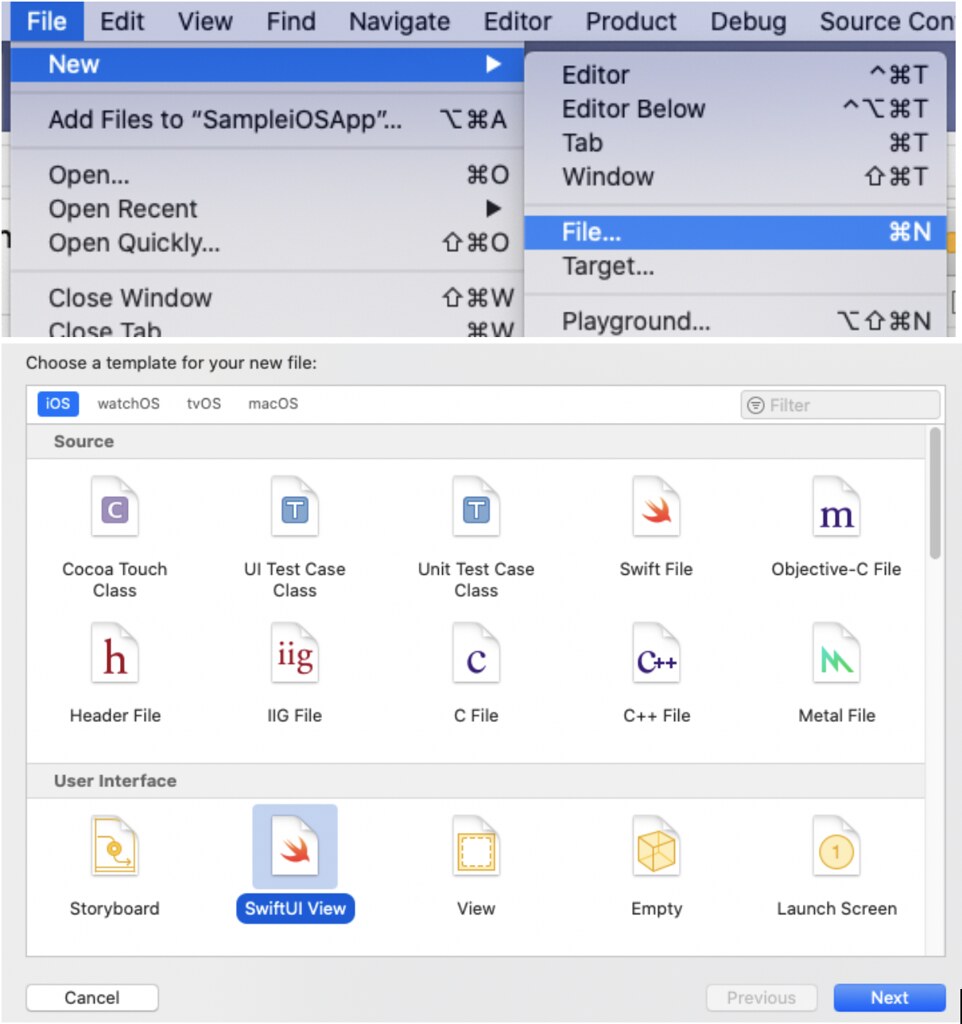
Enter the name MapView and click Next. When Xcode completes the task you’ll have a new file called MapView.swift with code like this:
Taking it Further
At this point we’ve successfully created a bare-bones iOS application using Xcode 11 and SwiftUI for iOS 13 and used the TomTom Maps SDK to embed a map.
We can take this further and provide a list of locations, or use the user’s current location, and display them on the map:
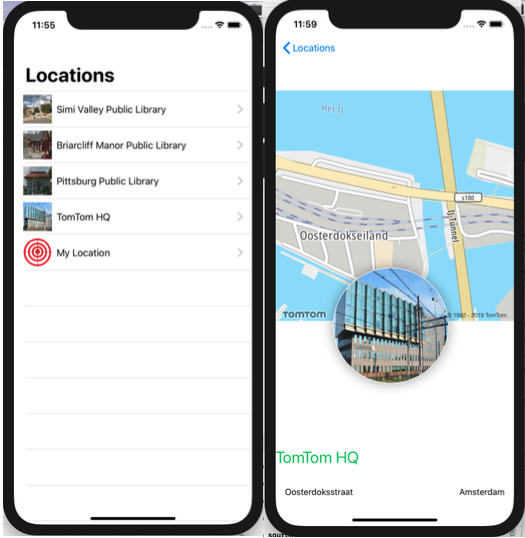
The sample application that accompanies this article does exactly this. Explore the example app and the comments to see a small example of what you might do with the TomTom map on a SwiftUI screen. Check out the TomTom documentation page to see how this can be extended even further: use tiles to display a 2.5D perspective, show live traffic, or play around with the styles to provide a Night Mode to compliment Dark Mode in iOS 13.
TomTom Sample Application
You can find a sample application that’s implemented in both Swift and Objective-C on the TomTom SDK downloads page. It demonstrates dozens of functions available with the TomTom SDKs. Everything that’s done in this sample app will work on the map inside the SwiftUI wrapper we’ve just created.
A note about building the examples: You’ll have to fill in your own bundle ID for the application target in the SampleiOSApp included with this article. You’ll need to do the same for all four targets included with the TomTom samples.
This article was first published on TomTom’s blog.
If you’re interested in developing expert technical content that performs, let’s have a conversation today.