Search

Embedded IoT Databases with Actian Zen and Python

Introduction

In the past, embedded computing was a tiny niche of the software development world. Hardware was expensive, difficult to obtain, and even more difficult to write software for. Fortunately, that is changing. With the introduction of inexpensive, easy-to-use embedded devices like the Raspberry Pi, IoT computing has moved into the mainstream.

While not as small as Arduinos or ESP32-based devices, mini-computers like the Raspberry Pi are small enough in terms of size and power consumption, to embed in a hardware solution like a weather station. With this in mind, we’re going to look at how to use an embedded database – Actian Zen – to store and process data on a Raspberry Pi.

Why an Embedded Database?

Embedded computers like the Raspberry Pi can talk to a wide variety of sensors. These sensors can measure things like temperature, moisture, wind speed, light levels, heartbeats, motion, acceleration, and even levels of gases like oxygen and carbon dioxide.

When monitoring sensors continually, embedded computers generate a lot of data. Envision a weather station that is measuring temperature, wind speed, humidity, and barometric pressure. If you’re reading data from the sensors every 30 seconds, you’re going to be recording thousands of measurements every day.

You could just set up your embedded device to forward all of its sensor readings to a central server for processing. But you might not want to. Embedded devices like our hypothetical weather station are often operating in remote locations, using mobile internet connections that are slow, unreliable, and expensive.

To ensure that our device doesn’t use too much network bandwidth and is still useful if the network is down, we need a way to store and aggregate data. That’s where Actian Zen comes in. Let’s take a look at how to set up Zen on a Raspberry Pi, and store sensor data in it from a Python application.

Prerequisites

The rest of this tutorial is going to proceed on the following:

  • You have a Raspberry Pi with Raspbian Linux installed and running.
  • You’re able to use the Linux terminal. You don’t need to be an expert since I’ll tell you exactly what commands to run.
  • You understand basic SQL commands like SELECT and INSERT.

Setup

To get started, you’ll need to download Actian Zen. You can use the web browser on your Pi to download it directly or download Zen onto your computer and transfer it to your Pi using a USB flash drive.

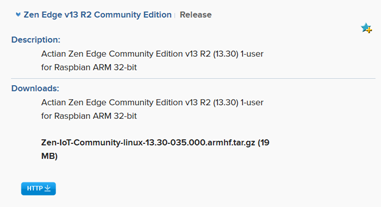
Start by loading the Actian downloads page. In the Select Via Product dropdown boxes choose the following:

  • Product: Actian Zen Community Edition
  • Release: V13 R2 Community Edition
  • Platform: Raspbian ARM 32-bit
    When you’ve set the filters, you’ll see Zen Edge v13 R2 Community Edition appear below. Click on it, and then click on the blue HTTP button to start your download.

After the download completes, open up a terminal. On Raspian, you can do this by clicking on the  icon near the top of the screen.

Next, navigate to the directory where you downloaded Actian Zen. If you downloaded it directly onto the Pi, change to the directory with the following command:

				
					cd ~/Downloads


Run this command to unpack Zen:

				
					sudo tar -C /usr/local -xvf Zen-IoT-Community-Linux-13.30-035.000.armhf.tar.gz


Zen’s install scripts expect it to reside in the /usr/local directory, so that’s where we’ve unpacked it. Next, run the following commands in order:

				
					sudo apt install unixodbc
cd /usr/local/psql/etc
sudo ./preinstall.sh
sudo ./postinstall.sh


We start by installing the unixodbc package. unixodbc is an Open Database Connectivity (ODBC) driver for Unix and Unix-like operating systems. ODBC provides a standard way for applications to connect to databases. We’ll be using it to access Zen from our Python application.

We then change to the psql directory to which we unpacked Zen. Finally, we run Zen’s preinstall and postinstall scripts. Preinstall checks that your system meets the requirements of the version of Zen you’re trying to install. If you download the Raspbian build of Zen, you won’t encounter any trouble. Postinstall is where the magic happens – it creates a new psql user, sets up Zen, starts the Zen daemon, creates a DEMODATA database, then fills the demo database with sample data.

Next, we need to run a few more commands as superuser to make Zen accessible via ODBC. A word of caution: running as superuser is potentially dangerous – if we accidentally run a command to delete our entire filesystem, Raspbian will gladly comply. Be sure to double check the commands you enter before running them.

				
					sudo su

cd /etc
cat /usr/local/psql/etc/odbc.ini >> ./odbc.ini
cat /usr/local/psql/etc/odbcinst.ini >> ./odbcinst.ini
exit


All that we’ve done above is appended Zen’s ODBC configuration data to our system-wide ODBC configuration files. Copying the configuration is what makes it possible for applications to locate and connect to Zen via ODBC. The last exit command makes you no longer a superuser.

There’s one more command we must run:

				
					cat /home/psql/.bashrc >> ~/.bashrc


We finish up by appending the data from the psql user’s Bash configuration file to our own user’s Bash configuration file. This adds Zen’s shared libraries to our user’s library load path. Without this step, our Python application won’t be able to find the libraries it needs to connect to Zen.

Python Application

We’re going to create a Python 3 application that samples CPU temperature data every 15 seconds and writes it to Zen. Our application will also demonstrate how to query aggregate data from Zen, which is exactly what you’d want to do in preparation for sending the data to a central server.

Before we start writing our application, we’ll need to install a package that enables Python to connect to ODBC databases. In your terminal, run the following:

				
					sudo apt install python3-pyodbc


This command installs a pre-built version of the pyodbc package. With that done, we’re ready to write our app!

To begin, open a text editor of your choice. Raspbian comes with Thonny, which is a lightweight Python IDE. Thonny is a good choice if you’re not sure what to use. I won’t make any assumptions about which editor you’re using, though, so feel free to use something else.

Next, create a directory for your new app. I like to create a projects directory under my home directory, and then keep my projects in it. Here’s how you’d do that:

				
					mkdir ~/projects
mkdir ~/projects/zen-iot
cd ~/projects/zen-iot


These commands create a new directory for your app, and then change the current directory to your new app directory. Keep this terminal window open, because we’re going to use it to run our app.

In your text editor, create a new file, and save it in your app directory as setup.py. Put the following code in it:

				
					import pyodbc

conn_str = "Driver={Pervasive ODBC Interface};server=localhost;DBQ=demodata"
db = pyodbc.connect(conn_str)
c = db.cursor()

print("Setting up database...")
c.execute("DROP TABLE IF EXISTS cpu_data")
c.execute("CREATE TABLE cpu_data (id identity, timestamp bigint, temperature real)")
c.execute("CREATE INDEX cpu_data_time on cpu_data (timestamp)")


We start by importing the pyodbc library. Next, we create an ODBC connection string. Although full coverage of ODBC is beyond the scope of this tutorial, you can read more about Zen and OBDC here.

In the connection string, you’ll notice that we’re using the pre-existing demodata database than Zen created during installation. In a production app, you’d want to create a new database.

Next, we connect to the database and issue three SQL commands: one to drop the table if it already exists, one to create the table, and one to add an index to the table. The index on the timestamp is important because we’ll be querying temperature by timestamp, and the index ensures that lookup will be fast.

Note that we’re using a bigint to store a timestamp instead of a SQL date type. We’re doing this because we’ll be storing the timestamp as Unix time.

Next, create a file in your app directory named write.py. Add the following code to it:

				
					import time
import sys
import subprocess
import pyodbc

def get_cpu_temperature():
  output = subprocess.check_output(["cat","/sys/class/thermal/thermal_zone0/temp"])
  temp_value = float(output) / 1000
  return temp_value

def main():
  conn_str = "Driver={Pervasive ODBC Interface};server=localhost;DBQ=demodata"
  db = pyodbc.connect(conn_str)
  c = db.cursor()
  insert_command = """INSERT INTO cpu_data VALUES (0, ?, ?)"""

  while True:
    current_temp = get_cpu_temperature()
    print("Saving temperature: {0}".format(current_temp))
    timestamp = int(time.time())
    c.execute(insert_command, (timestamp, current_temp))
    c.commit()
    c.execute("SELECT COUNT(*) FROM cpu_data")
    row = c.fetchone()
    if row:
      print('Total temperature records:', row[0])
    time.sleep(30)

    
  return 0
   
if __name__ == "__main__":
  sys.exit(main())


We begin by importing pyodbc and several parts of the Python standard library.

Next, we create a function to read the CPU temperature. Since Linux exposes system information as part of the filesystem, we’re going to shell out to the cat command to read the /sys/class/thermal/thermal_zone0/temp file. This file contains the current CPU temperature in thousandths of a degree Celsius. To convert it to degrees, we divide it by 1000.

Then, we get to the heart of our application in the main function. The connection string and database the connection are identical to what we saw in setup.py. We then create a SQL command that we’ll use to insert new records into the database.

Finally, we enter a loop that gets the current temperature, writes it to the database, and then waits 30 seconds. This gives us an application that will run forever and record CPU temperature to the database every 30 seconds. In a production IoT Linux app, you would typically set up your application as a systemd service. This makes it easy to ensure that your application will automatically start when the IoT device starts, and will automatically restart if it crashes.

We have one more bit of code to add. In your app directory, create a file named read.py and enter the following code:

				
					import pyodbc
import time

conn_str = "Driver={Pervasive ODBC Interface};server=localhost;DBQ=demodata"
db = pyodbc.connect(conn_str)
c = db.cursor()

five_mins_ago = int(time.time()) - 300
query = "SELECT AVG (temperature) FROM cpu_data WHERE timestamp > ?"
result = c.execute(query, (five_mins_ago,))
row = result.fetchone()

if row:
    print("Average temperature over past 5 minutes: {0}".format(row[0]))


Here, we’re connecting to the database, calculating a Unix timestamp for five minutes ago, and then running a SQL command to fetch the average CPU temperature over the past five minutes. We then output this value to the terminal.

In a real IoT application, you’d want to send this data off to the cloud or a private server. As discussed earlier, being able to aggregate data and do any necessary calculations on it before transmitting it to a central location is exactly the reason we’d want to use a database like Zen in an IoT application.

To run the app we’ve created, run the following commands from your app’s directory:

				
					python3 setup.py
python3 write.py


Let this run for 5-10 minutes to save some temperature data into Zen. After that, press CTRL-Z on your keyboard to terminate the app.

Finally, run:

				
					python3 read.py


You’ll see your Raspberry Pi’s average CPU temperature over the past five minutes.

Now that you’re up and running, consider using Zen to store and process more complex sensor data on the Raspberry Pi. If you’re not sure where to start, there are many inexpensive sensor kits available for the Pi. With so many interesting sensors to choose from, you’re bound to come up with something great!

If you’re interested in developing expert technical content that performs, let’s have a conversation today.

Facebook
Twitter
LinkedIn
Reddit
Email

POST INFORMATION

If you work in a tech space and aren’t sure if we cover you, hit the button below to get in touch with us. Tell us a little about your content goals or your project, and we’ll reach back within 2 business days. 

Share via
Copy link
Powered by Social Snap