Digital mapping SDKs and APIs are great. They let us embed maps in our web and mobile apps with only a few lines of code. And, with just a few lines more, we can add trip routing and even live traffic to our apps.
But what if we want to do something out of the ordinary? Not all trips are simple station-to-station journeys. Routing isn’t always about getting from A to B as quickly as possible. For example, what if we’re making an app for people who just bought a convertible and want to have a little excitement while they drive?
And what about businesses with unique routing requirements? If, for example, we own a company that transports hazardous materials, taking the shortest delivery routes from our factory to our customers could get us in big trouble. Many cities restrict where we can drive with dangerous cargo.
This article discusses some of the fun and unique features in TomTom’s developer APIs. We explore specific uses cases demonstrating how we can use TomTom’s APIs to solve our problems. We use React as a frontend framework for our application. So, let’s start by firing up our project and installing the libraries. Here’s the full demo link.
Installation
To create a React app, we must first ensure we have Node.js installed. If you haven’t built a React app before, you can check to see if you have Node.js installed by typing the following in your terminal:
node -v
If you don’t have it, go to the Node.js website to download the latest version.
Creating a React App
Once that’s complete, we can start with our React app by running this command:
npx create-react-app tomtom-maps
Then, we navigate into our project folder:
cd tomtom-maps
Installing TomTom’s Tools
First, we install the TomTom Maps and Services SDK to use TomTom’s searching and routing services. We use this command to install the library:
					npm i @tomtom-international/web-sdk-services
npm i @tomtom-international/web-sdk-maps
To use these services in your app, you must first register as a TomTom developer. It’s free to sign up. Once you’re signed up, you can enjoy thousands of transactions daily, even for commercial applications. If your app’s popularity skyrockets later, you can always pay as you grow.
You get an API key with your account. Take note of the API key because we come back to it shortly.
The “Thrilling” Route
Ordinarily, TomTom’s Route API returns the fastest routes possible to arrive at your destination. But let’s imagine a situation where you have some free time on your hands and want to go on an adventure, go off-roading, or just explore your city. You can add some routing parameters like thrilling, hilliness, and windingness.
The thrilling parameter executes the route calculation to include interesting or challenging roads and use as few highways as possible. Note that there is a limit of 900 kilometers on routes planned with routeType=thrilling. We can use hilliness to set the degree of hilliness for a thrilling course. The default value of hilliness is normal, but it can take other values like low and high. We can also use windiness to determine the number of turns on the road for the thrilling route. The default value of windiness is normal, but it can take other values like low and high.
Note: You can use windiness and hilliness only in conjunction with routeType=thrilling.
Now, let’s get into our React project to implement this solution. Let’s add two important SDKs and a style sheet:
					import "@tomtom-international/web-sdk-maps/dist/maps.css";
import * as ttmaps from "@tomtom-international/web-sdk-maps";
import tt from "@tomtom-international/web-sdk-services";
These lines import the default map stylesheet, TomTom Maps JavaScript SDK, and TomTom Services JavaScript SDK.
Now, we must also import useRef, useEffect, and useState into the project. useRef helps to manipulate the DOM directly within React. We use it to add our map during the initial loading of the site.
import { useState, useEffect, useRef } from "react";
We use useEffect to initialize our map (using the map SDK). This Effect Hook is the key to making our TomTom map work seamlessly with React. It runs after the component mounts, calling the TomTom Maps Web SDK’s tt.map function to create our map.
We use useState to hold the variables that we employ in this project, including our maps.
					export default function calculateRoute() {
  const mapElement = useRef();
  const [startLatitude, setStartLatitude] = useState("2.7505287");
  const [startLongitude, setStartLongitude] = useState("41.6709659");
  const [destinationLatitude, setDestinationLatitude] = useState(
    "2.5010908655347097"
  );
  const [destinationLongitude, setDestinationLongitude] = useState(
    "41.57083364442753"
  );
  const [result, setResult] = useState({});
  const [mapZoom, setMapZoom] = useState(17);
  const [map, setMap] = useState({});
}
calculateRoute, we use useState to add the latitude and longitude for the start and destination. result will hold the results from our route search.
The variable mapZoom sets the zoom for our map to 17.
The variable map holds the value for our map after adding it to the site.
Next up, we make use of useEffect to initialize our map as soon as the site loads.
					useEffect(() => {
    let map = ttmaps.map({
      key: "<Your API Key>",
      container: mapElement.current,
      center: [2.75044, 41.67096],
      zoom: mapZoom
    });
    setMap(map);
    return () => map.remove();
  }, []);
Within the map object, we declare details, like the API key we talked about earlier and the container to which we attach the map, which we defined with useRef. We use center to specify the default latitude and longitude the map displays to the user on loading, and zoom sets the map magnification level, which we’ve declared already.
Now we add our map inside a div, like this:
<div ref={mapElement} className="mapDiv"></div>
ref={mapElement} tells React precisely where to attach the map to the DOM. You can also define a height for the div using the CSS class mapDiv.
					.mapDiv {
  height: 30rem
}
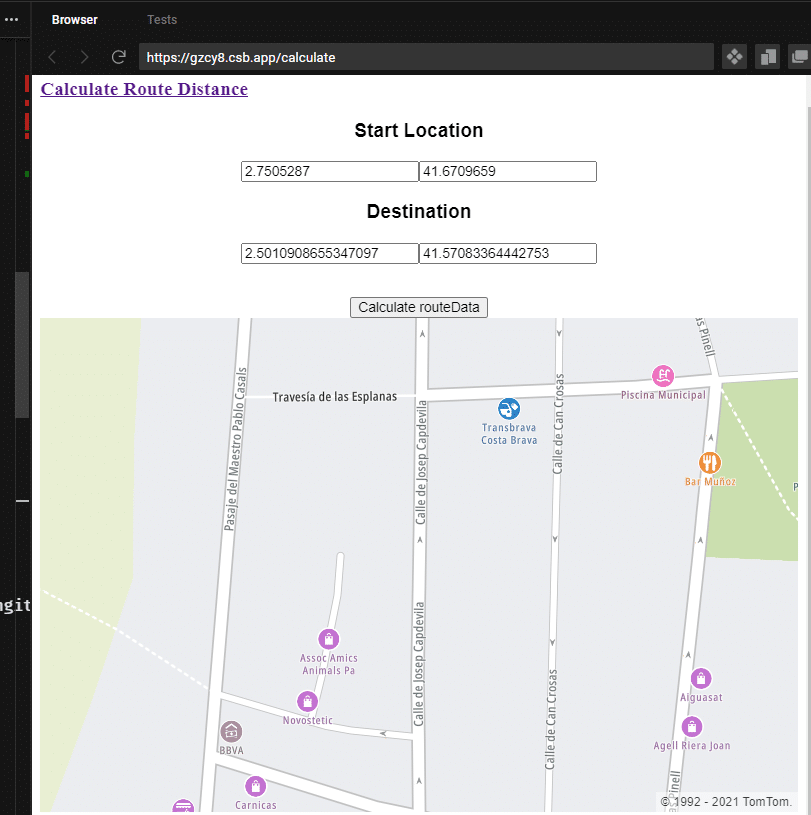
At this point, we add <input/> tags and a button to determine the user’s latitude and longitude.
					return (
    <div className="App">
      <div>
        <h3>Start Location</h3>
        <input
          className="input"
          type="text"
          placeholder="Latitude"
          value={startLatitude}
          onChange={(e) => {
            setStartLatitude(e.target.value);
          }}
          required
        />
        <input
          className="input"
          type="text"
          placeholder="Longitude"
          value={startLongitude}
          onChange={(e) => {
            setStartLongitude(e.target.value);
          }}
          required
        />
        <h3>Destination</h3>
        <input
          className="input"
          type="text"
          placeholder="Latitude"
          value={destinationLatitude}
          onChange={(e) => {
            setDestinationLatitude(e.target.value);
          }}
          required
        />
        <input
For the value of the input tags, the code synchronizes with the variables defined earlier with useState. The onChange variable updates the respective useState values as the user edits it. Plus, we added a button to calculate the route.
Now, let’s add logic so we can calculate the route once we click the button. When we click the button, it calls the calculateRoute function.
First, we use the tt.services.calculateRoute object to collect credentials and the locations we want to calculate. We also set the thrilling, hilliness, and windingness parameters here.
Once we get our response, we use setResult(data) to collect it within result. Then we define a new variable called direction, an array to collect the exact coordinates to draw on the map itself.
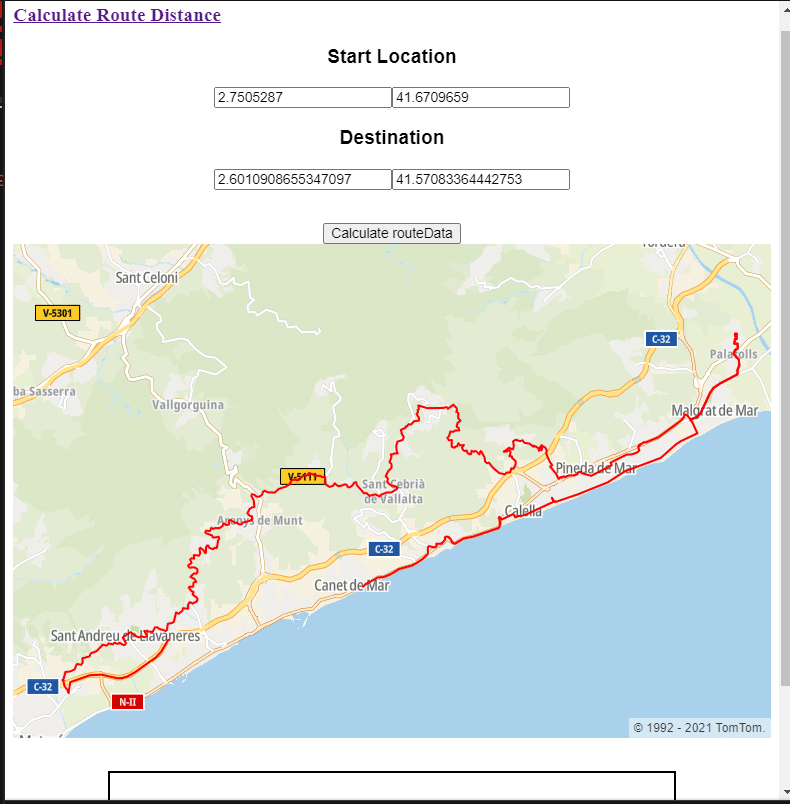
We now use map.addLayer to alter the map by drawing our coordinates. We set the id of the layer using Math.random().toString(). We add color and layout, then set the coordinates to direction. If done correctly, you should get this:
					const calculateRoute = () => {
    tt.services
      .calculateRoute({
        key: "<Your API Key>",
        routeType: "thrilling",
        hilliness: "high",
        windingness: "high",
        locations: `${startLatitude},${startLongitude}:${destinationLatitude},${destinationLongitude}`
      })
      .go()
      .then(function (routeData) {
        console.log(routeData.toGeoJson());
        const data = routeData.toGeoJson();
        setResult(data);
        const direction = routeData.toGeoJson().features[0].geometry.coordinates;
        map.addLayer({
          id: Math.random().toString(),
          type: "line",
          source: {
            type: "geojson",
            data: {
              type: "FeatureCollection",
              features: [
                {
                  type: "Feature",
                  geometry: {
                    type: "LineString",
                    properties: {},
                    coordinates: direction
                  }
                }
              ]
            }
          },
          layout: {
            "line-cap": "round",
            "line-join": "round"
          },
          paint: {
            "line-color": "#ff0000",
            "line-width": 2
          }
        });
        map.setCenter([parseFloat(startLatitude), parseFloat(startLongitude)]);
      })
      .catch((err) => {
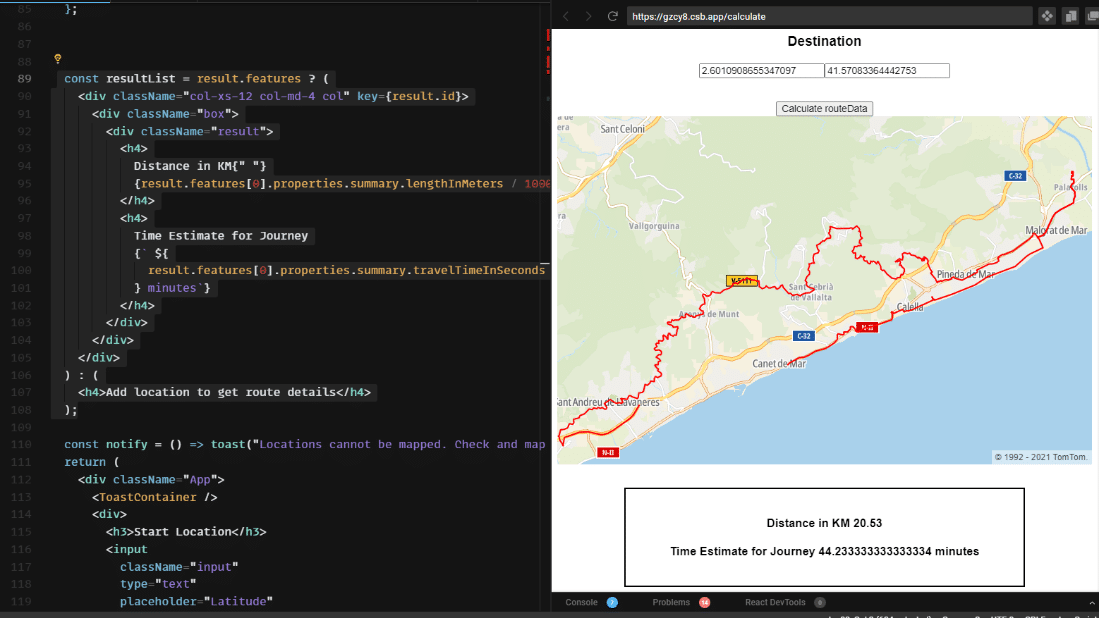
					 const resultList = result.features ? (
    <div className="col-xs-12 col-md-4 col" key={result.id}>
      <div className="box">
        <div className="result">
          <h4>
            Distance in KM{" "}
            {result.features[0].properties.summary.lengthInMeters / 1000}
          </h4>
          <h4>
            Time Estimate for Journey
            {` ${
              result.features[0].properties.summary.travelTimeInSeconds / 60
            } minutes`}
          </h4>
        </div>
      </div>
    </div>
  ) : (
    <h4>Add location to get route details</h4>
  );
To do this, we add a condition that checks to see if result.features is valid. Valid means the result isn’t empty, so we’re sure the code already called the calculateRoute function. We get a map like this:
Unusual Load Types (Like Radioactive Materials)
To transport unusual materials, including radioactive materials, we can use a vehicleLoadType parameter. There are different values for this parameter based on the load we want to transport.
We can use these codes to represent items while moving in the United States:
USHazmatClass1: ExplosivesUSHazmatClass2: Compressed gasUSHazmatClass3: Flammable liquidsUSHazmatClass4: Flammable solidsUSHazmatClass5: OxidizersUSHazmatClass6: PoisonsUSHazmatClass7: RadioactiveUSHazmatClass8: CorrosivesUSHazmatClass9: Miscellaneous
For other countries, we can use these values:
otherHazmatExplosive: ExplosivesotherHazmatGeneral: MiscellaneousotherHazmatHarmfulToWater: Harmful to water
So, for transporting radioactive materials specifically, all we must do is to go to tt.services.calculateRoute, and specify the value for radioactive material in the vehicleLoadType parameter.
					tt.services
     .calculateRoute({
        key: "",
        routeType: "thrilling",
        hilliness: "high",
        vehicleLoadType: "USHazmatClass7",
        windingness: "high",
        locations: `${startLatitude},${startLongitude}:${destinationLatitude},${destinationLongitude}`
      })
Reachable Range
Reachable range determines a user’s current location, and the value of certain parameters likefuelBudgetInLiters, energyBudgetInkWh, timeBudgetInSec, and distanceBudgetInMeters. Then, it responds with the farthest limit that one can go. Here’s a list of the available parameters:
FuelBudgetInLitersallows us to add our available fuel level in liters, and we get back the farthest physical location we can reach using the specified Combustion Consumption ModelEnergyBudgetInkWhallows us to add our current electric energy use in kilowatt-hours (kWh). That determines the farthest physical location that we can reach using the specified Electric Consumption model.TimeBudgetInSecis the time budget in seconds that determines the maximum range that we can travel.DistanceBudgetInMetersparameter lets us add the maximum distance we want to travel in meters. That determines the farthest locations we can travel, based on the maximum distance we want to go.
timeBudgetInSec as an example. We add the time in seconds, versionNumber(1), current location (origin), and we get back how much distance we can travel based on the time constraint provided.
					  const routeUp = () => {
   tt.services
 .calculateReachableRange({
    key: "<Your API Key>",
    versionNumber: 1,
    timeBudgetInSec: 1000,
    origin: [parseFloat(2.7505287), parseFloat(41.6709659)],
  })
  .go().then((routeData) => {
    const data = routeData.toGeoJson();
    console.log(data);
  }).catch(err => console.log(err))
  }
The response is a collection of coordinates forming a boundary around the user’s current location (origin).
Conclusion
We’ve explored all these unique and exciting ways to use TomTom’s API, but there’s so much more possibility. Just look through the documentation and customize the available technology to solve your unique navigation challenges within your application.
If you want to have some fun with a practical app, try TomTom developer APIs for yourself.
If you’re interested in developing expert technical content that performs, let’s have a conversation today.