CockroachDB is a distributed relational database that enables users to scale their application and production software without hardware limitations. CockroachDB Serverless is the fastest way to get started using this relational database. It only takes two steps: sign up using your GitHub account, then connect your cluster using the connection information relevant to your system’s operating system.
Integrating CockroachDB into a Django application is seamless thanks to its feature-rich object-relational mapping (ORM) that lets us interact with the database using a fluent object-oriented API.
In this article, we’ll explore how well CockroachDB and Django work together by building a simple application using the Django ORM to communicate with CockroachDB via CockroachCloud. Then we’ll deploy our application to Heroku.
The final application will be a game leaderboard that enables users to enter information about their gameplay, then store that data in a database. The user interface then retrieves this data to display information about which games the user played, for how many hours, and more.
It helps to be familiar with Python and Django when following along with this tutorial. It’s also important to note that the article uses Python 3.8 or Python 3.9 as the recommended Python versions. And, if you’d like to see the final files, the application’s source code is available via GitHub.
Setting Up
For this tutorial, we need to ensure we’re registered for a CockroachDB account.
To start our application, we’ll begin by installing pip in our system to be able to install python packages. This documentation provides steps on how to install pip depending on the operating system being used.
Next, we create a project directory called cockroachDB. While inside this directory, we create a virtual environment, venv, and activate it. Then install Django, as shown below:
					mkdir cockroachDB
cd cockroachDB
python3 -m venv venv
source venv/bin/activate
pip install django
- Linux/macOS: use
source venv/bin/activate - Windows: use
\venv\Scripts\activate‘ if you’re using a cmd-based terminal, or ‘.\venv\Scripts\activate.ps1‘ if you’re running PowerShell
game and a Django app called core:
					django-admin startproject game .
python3 manage.py startapp core
settings.py file, as shown below:
					INSTALLED_APPS = [
	'django.contrib.admin',
	'django.contrib.auth',
	'django.contrib.contenttypes',
	'django.contrib.sessions',
	'django.contrib.messages',
	'django.contrib.staticfiles',
	'core.apps.CoreConfig',       #Add
]
manage.py runserver, it serves the default Django application.
Adding CockroachDB
Django uses SQLite by default, and even generates a new SQLite database when we create a new application, but we want to use CockroachDB. Since we want to use CockroachDB, let’s set up a cluster and create a database for our application to use. First, in our CockroachDB Serverless account, we go to the create your cluster page and select CockroachDB Serverless as our preferred type. Then, we create a cluster by clicking Create your free cluster on the clusters page. The other plan available is Dedicated, which is a premium-based plan with added functionalities that allow users to have multi-region capabilities. When creating a free cluster, we can choose to leave the default parameters as they are. These include Cloud provider, Regions, Spend limit, and Cluster name.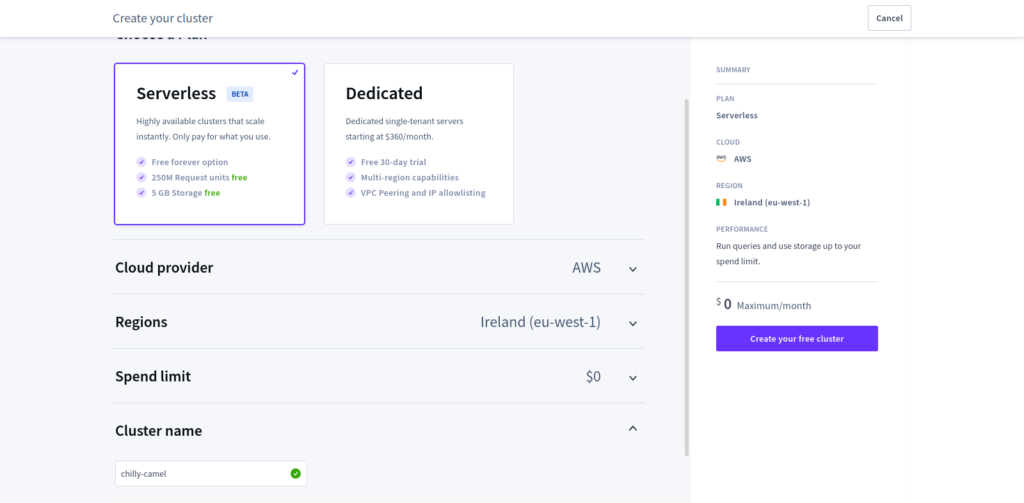
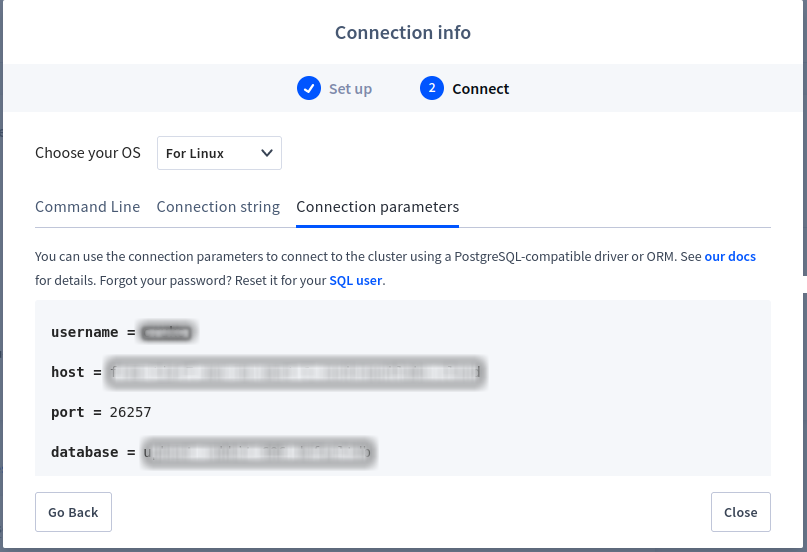
After creating our cluster, CockroachDB Serverless pops up a Connection Info box. There, we create a cluster connection with the default SQL user based on our operating system. We select the appropriate option from the Choose your OS dropdown menu.
cockroach sql --url='postgres://<username>:<password>@<global host>:26257/<cluster_name>.defaultdb?sslmode=verify-full&sslrootcert=<certs_dir>/cc-ca.crt'
Note that the Connection Info contains a password that will be provided only once. We need to be sure to save this string, as we’ll use it later.
Next, we download the CockroachDB client and CA certificates using the commands provided. It should look like the following example:
curl --create-dirs -o ~/.postgresql/root.crt -O https://cockroachlabs.cloud/clusters/<cluster-id>/cert
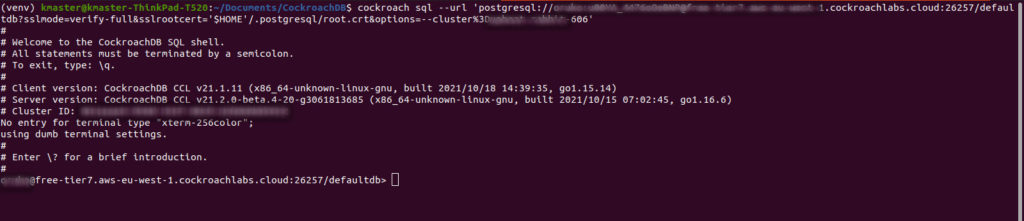
cockroach sql --url to connect to our database using the connection string we saved earlier. An example of the connection string is shown below:
cockroach sql --url 'postgresql://<username>:<password>@<serverless-host>:26257/defaultdb?sslmode=verify-full&sslrootcert='$HOME'/.postgresql/root.crt&options=--cluster=<cluster-name>-<tenant-id>'
We should see an output similar to this:
Now, we create a database called game for our application in the prompt SQL shell. We do this with the following command:
> CREATE DATABASE game;
Exit using the command using:
> \q.
certs folder in the root of our CockroachDB application with the following command:
mkdir certs
root.crt file’s path by copying the file into the certs folder.
cp -p $HOME/.postgresql /Documents/Django/CockroachDB/certs
.gitignore file so our certificates won’t end up on GitHub. To do this, we add certs/ to a new line at the end of our .gitignore file.
Installing Dependencies
To use CockroachDB with Django, we need to install a few dependencies using pip: django, psycopg2, dj-database-url, and django-cockroachdb. We also need to install additional dependencies we’ll use when deploying our application to Heroku:django-heroku, gunicorn, and whitenoise. We install them all at once with the command shown below:
pip install django psycopg2 dj-database-url django-cockroachdb django-heroku gunicorn whitenoise
pip freeze > requirements.txt to create the requirement.txt file and list our application’s dependencies.
Our requirements.txt file is as follows:
					asgiref==3.4.1
backports.zoneinfo==0.2.1
dj-database-url==0.5.0
Django==3.2.9
django-cockroachdb==3.2.1
django-crispy-forms==1.13.0
django-heroku
gunicorn
psycopg2==2.9.2
pytz==2021.3
sqlparse==0.4.2
whitenoise
Configuring CockroachDB
To configure CockroachDB to work with Django, we need to delete the default database and thedb.sqlite file from our application by using the command below:
rm -rf db.sqlite
game/settings.py, we add the CockcoachDB database:
					import os
import environ
import dj_database_url

# reading .env file
env = environ.Env()
environ.Env.read_env()

………………….

DATABASES = {
    'default': {
        'ENGINE': 'django_cockroachdb',
        'NAME': env('DATABASE_NAME'),
        'USER': env('DATABASE_USER'),
        'PASSWORD': env('DATABASE_URL'),
        'HOST': env('DATABASE_HOST'),
        'PORT': env('DATABASE_PORT'),
    },
}

DATABASES['default'] = dj_database_url.config(default=os.path.expandvars(
    os.environ['DATABASE_URL']), engine='django_cockroachdb')
os, environ, and dj_database_url, as the database_url needs them. Then install env() by pip install django-environ and make it readable by creating an instance.
The code places all database credentials in the game/.env file.
- The
DATABASE_NAMEis game, the database we created in the SQL shell. - The
DATABASE_USERandDATABASE_PASScome from the connection string we saved earlier (the string we used to connect to the database). - The
DATABASE_HOSTwe’ll use is localhost. - The
DATABASE_PORTfor CockroachDB is 26257.
.env file:
					SECRET_KEY="<secret_key>"
DATABASE_NAME="game"
DATABASE_USER="<database_username>"
DATABASE_PASS="<database_password>"
DATABASE_PORT="26257"
DATABASE_URL="postgresql://<username>:<password>@<serverless-host>:26257/defaultdb?sslmode=verify-full&sslrootcert=certs/root.crt&options=--cluster=<cluster-id"
DEBUG="True"
DATABASE_HOST="localhost"
Making Additional Adjustments
After setting the environment variables, we’ll need to do a few things. First, we export thedatabase_url from our terminal and change the root.crt path to the path we customized earlier in our application project. Here’s an example of this:
export DATABASE_URL="postgresql://<username>:<password>@<serverless-host>:26257/defaultdb?sslmode=verify-full&sslrootcert=certs/root.crt&options=--cluster=<cluster-id>"
defaultdb to game, the database we created earlier: 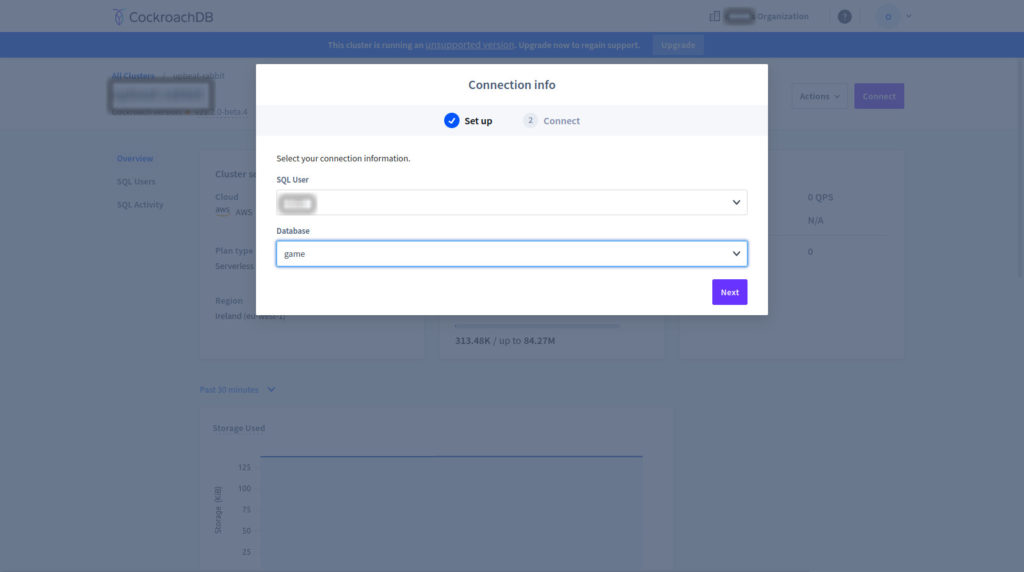
Building the App
Now, we’ll implement a simple web application with a game leaderboard. The application has models, views, and templates. Models contain the fields and information about their contents. Views handle the logic for manipulating the models using requests and responses. The application renders the logic to templates that can output the result to the browser when the server runs.Setting up the Models
First, in the app’sCockroachDB/core/models.py file, we add a Game class:
					from django.db import models

class Game(models.Model):
    """
    Game model class.
    """
    name = models.CharField(max_length=100)
    viewer_hour = models.PositiveIntegerField()
    hours_streamed = models.PositiveIntegerField()
    acv_num = models.PositiveIntegerField()
    creators = models.PositiveIntegerField()
    streams_num = models.PositiveIntegerField()

    def __str__(self):
        return f'{self.name}'
__str__() returns the game’s name instead of the class name when the user views the admin panel.
This humble class is the key to all of our application’s interactions with CockroachDB. Using the Game class, Django can create a migration that connects to our CockroachDB database and creates a table to store leaderboard data.
Setting up the Views
In theCockroachDB/core/views.py file, we import the Game model first, then create the views using Django class-based views. We create two views: one view lists the entries from the database and entries users submitted via the form, and the other is a create-view enabling users to enter some data using a form:
					from django.shortcuts import render
from django.views.generic import ListView, CreateView
from .models import Game


class GameListView(ListView):
    """
    Class-Based View showing the user information and game details.
    """
    model = Game
    template_name = 'core/index.html'
    context_object_name = 'games'
    paginate_by = 10


class GameCreateView(CreateView):
    """
    Class-Based view detailing how to create user's information.
    """
    model = Game
    fields = ['name', 'viewer_hour', 'hours_streamed', 'acv_num', 'creators', 'streams_num']
GameListView code above defines the template name and the context object name used to iterate template data. GameCreateView doesn’t have a defined template name. Instead, we use the default class-based views naming convention <app/<model>_<viewtype>.html. The code above also specifies the form’s fields.
Setting up Routing
Before creating the templates, we create aCockroachDB/core/urls.py file inside the app to route the views path. In the CockroachDB/core/urls.py, we import the views and implement them, like this:
					from django.urls import path
from .views import GameListView, GameCreateView

urlpatterns = [
    path('', GameListView.as_view(), name='home'),
    path('new/', GameCreateView.as_view(), name='game-create'),
]
game/urls.py, we pass the path of the apps urls.py by importing include and implementing it like this:
					from django.contrib import admin
from django.urls import path, include

urlpatterns = [
    path('admin/', admin.site.urls),
    path('', include('core.urls')),
]
Creating the Templates
To create the templates, we create a directory calledCockroachDB/core/templates with a directory called core inside it.
Note that this architecture is a Django convention. We can make the templates with or without it, but it’s recommended to use it.
We start by creating the templates/core/base.html template so other templates can inherit from it.
In the templates/core/base.html file, we can use Bootstrap 5, Font Awesome, and CSS for quick styling by importing them as a content delivery network (CDN). Then, we create the navbar and pass the template blocks to make it extensible. The code implementation is as follows:
					{% load static %}
<!DOCTYPE html>
<html lang="en" dir="ltr">
  <head>
    <meta charset="utf-8">
    <link href="https://cdn.jsdelivr.net/npm/bootstrap@5.0.2/dist/css/bootstrap.min.css" rel="stylesheet" integrity="sha384-EVSTQN3/azprG1Anm3QDgpJLIm9Nao0Yz1ztcQTwFspd3yD65VohhpuuCOmLASjC" crossorigin="anonymous">
      <link rel="stylesheet" href="https://cdnjs.cloudflare.com/ajax/libs/font-awesome/5.15.4/css/all.min.css"/>
    <link rel="stylesheet" href="{% static 'css/core.css'%}">
    <title>Top Games LeadBoard</title>
  </head>
  <body>
    <!-- Navbar -->
    <nav class="navbar navbar-expand-lg bg-light navbar-light py-3 mb-5 fixed-top">
      <div class="container">
        <a href="{% url 'home'%}" class="navbar-brand" style="color: #4c7f99;">Top Games Leaderboard</a>
        <button
          class="navbar-toggler"
          type="button"
          data-bs-toggle="collapse"
          data-bs-target="#navmenu"
        >
        <span class="navbar-toggler-icon"></span>
        </button>

        <div class="collapse navbar-collapse" id="navmenu">
        </div>
      </div>
    </nav>
    <br>

    <!-- Showcase -->
    <div class="game-table mt-5">
      {% block content %}{% endblock content %}
    </div>

  </body>
</html>
Displaying the Data
To display the user entries and database data, we create a table in thetemplates/core/index.html file and iterate over the context class object. First, we need to extend the base.html file and pass the table in the template block, like this:
					{% extends 'core/base.html' %}

{% block content %}

<table class="table table-hover">
  <thead>
    <tr>
      <th scope="col">#</th>
      <th scope="col">Name</th>
      <th scope="col">Viewer Hours</th>
      <th scope="col">Hours Streamed</th>
      <th scope="col">ACV</th>
      <th scope="col">Creators</th>
      <th scope="col">Streams</th>
    </tr>
  </thead>

  {% for game in games %}
    <tbody>
      <tr class="list-color">
        <th scope="row">{{page_obj.start_index|add:forloop.counter0}}</th>
        <td>{{game.name}}</td>
        <td>{{game.viewer_hour}}</td>
        <td>{{game.hours_streamed}}</td>
        <td>{{game.acv_num}}</td>
        <td>{{game.creators}}</td>
        <td>{{game.streams_num}}</td>
      </tr>
    </tbody>
  {% endfor %}

</table>

{% endblock content %}
Creating a Form
We need to create a template form to add data to the application directly. Thedjango-crispy-forms application helps make the form look great. First, we use the command pip install django-crispy-forms to install the form-controlling application via the terminal. Then, we add crispy_forms to the list of installed apps in the game/settings.py file as shown below:
					…….
# Application definition
INSTALLED_APPS = [
    'django.contrib.admin',
    'django.contrib.auth',
    'django.contrib.contenttypes',
    'django.contrib.sessions',
    'django.contrib.messages',
    'django.contrib.staticfiles',
    'core.apps.CoreConfig',
    'crispy_forms',       #Add
]
…….
game/settings.py file:
					#setting template pack
CRISPY_TEMPLATE_PACK = 'bootstrap4'
game_form.html to create the form:
					{% extends 'core/base.html' %}
{% load crispy_forms_tags %}
{% block content %}
  <div class="content-section">
    <form method="post">
      {% csrf_token %}
      <fieldset class="form-group">
        <legend class="border-bottom mb-4">Game Form</legend>
        {{ form | crispy}}
      </fieldset>
      <div class="form-group mt-2">
        <button class="btn btn-outline-info" type="submit">Submit</button>
      </div>
    </form>
  </div>
{% endblock %}
templates/core/base.html as before, then loads crispy-forms tags and creates the form.
In a browser, the form looks like this: 
Improving the UI
An exemplary user interface (UI) design should have an icon on the navbar to add data to the application. The entries also need to be paginated, so we make these changes to thebase.html file:
					{% load static %}
<!DOCTYPE html>
<html lang="en" dir="ltr">
  <head>
    <meta charset="utf-8">
    <link href="https://cdn.jsdelivr.net/npm/bootstrap@5.0.2/dist/css/bootstrap.min.css" rel="stylesheet" integrity="sha384-EVSTQN3/azprG1Anm3QDgpJLIm9Nao0Yz1ztcQTwFspd3yD65VohhpuuCOmLASjC" crossorigin="anonymous">
      <link rel="stylesheet" href="https://cdnjs.cloudflare.com/ajax/libs/font-awesome/5.15.4/css/all.min.css"/>
    <link rel="stylesheet" href="{% static 'css/core.css'%}">
    <title>Top Games Leaderboard</title>
  </head>
  <body>
    <!-- Navbar -->
    <nav class="navbar navbar-expand-lg bg-light navbar-light py-3 mb-5 fixed-top">
      <div class="container">
        <a href="{% url 'home'%}" class="navbar-brand" style="color: #4c7f99;">Top Games Leaderboard</a>
        <button
          class="navbar-toggler"
          type="button"
          data-bs-toggle="collapse"
          data-bs-target="#navmenu"
        >
        <span class="navbar-toggler-icon"></span>
        </button>

        <!--Paginator & Icon -->
        <div class="collapse navbar-collapse" id="navmenu">
          <ul class="navbar-nav ms-auto">
            <li class="nav-item">
              {% if page_obj.has_previous %}
              <a href="?page={{ page_obj.previous_page_number }}" class="nav-link"><i class="fa fa-chevron-left"></i></a>
              {% endif %}
            </li>

            <li class="nav-item">
              <a href="#" class="nav-link">Page {{ page_obj.number }} of {{ page_obj.paginator.num_pages }}</a>
            </li>
            <li class="nav-item">
              {% if page_obj.has_next %}
                <a href="?page={{ page_obj.next_page_number }}" class="nav-link"><i class="fa fa-chevron-right"></i></a>
              {% endif %}
            </li>
            <li class="nav-item">
              <a href="{% url 'game-create'%}" class="nav-link"><i class="fa fa-plus-circle"></i></a>
            </li>
          </ul>
        </div>
      </div>
    </nav>
    <br>

    <!-- Showcase -->
    <div class="game-table mt-5">
      {% block content %}{% endblock content %}
    </div>

  </body>
</html>
Redirecting the User
After entering the data through the form, we want to redirect the user to the index page, where all the data is displayed. To implement redirection, we go to thecore/models.py file and import the reverse function. Then, we add the function below to handle the redirect:
					from django.urls import reverse

# ...existing code

# Handles redirect
    def get_absolute_url(self):
            return reverse('home')
Migrating the Database
We’ve added all the code our application needs to run. All that’s left is to generate and run a migration that will make a table for our game data in CockroachDB.
Let’s migrate our database by navigating to our project’s root directory and running:
					python manage.py makemigrations core
python manage.py migrate
That’s it! We’ve created the database table and our app is ready. Start the development server by running the following command:
django manage.py runserver
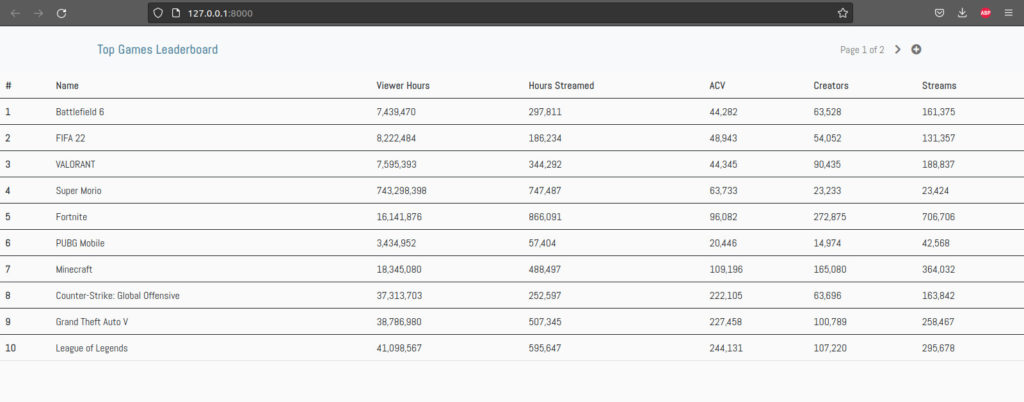
We navigate to http://localhost:8000 in our web browser, where we’ll see an empty table. This is because we haven’t added any games to our database yet. Let’s do that now.
We load http://localhost:8000/new to open the game creation form we added earlier. We add a few games, then navigate back to http://localhost:8000. We should see something like this:
Deploying the App
To deploy your application to Heroku, we first need to ensure Heroku CLI is installed in our local system. Our application also needs a few dependencies to host it in Heroku:django-heroku, gunicorn, and whitenoise, which we installed earlier. Django doesn’t serve static files in production, using whitenoise to enable this support.
Configuring Dependencies
We create a file calledProcfile in our project’s root directory and add web: gunicorn game.wsgi to the file (game is the project name). This specification shows that our application is a web application using gunicorn, a web server getaway.
In our game/settings.py file, we then add an import of django-heroku in the imports section at the top of our file:
					#...existing imports
import django-heroku
django_heroku.settings(locals()) to activate Django-Heroku and STATIC_ROOT = os.path.join(BASE_DIR, 'staticfiles') to configure our static assets. At this point, the settings.py file looks like this:
					import os
import environ
import django_heroku
import dj_database_url
from pathlib import Path


# Build paths inside the project like this: BASE_DIR / 'subdir'.
BASE_DIR = Path(__file__).resolve().parent.parent

 # reading .env file
env = environ.Env()
environ.Env.read_env()

# Quick-start development settings - unsuitable for production
# See https://docs.djangoproject.com/en/3.2/howto/deployment/checklist/

# SECURITY WARNING: keep the secret key used in production secret!
SECRET_KEY = env('SECRET_KEY')

# SECURITY WARNING: don't run with debug turned on in production!
# DEBUG = os.environ['DEBUG']
DEBUG = env('DEBUG')

# ALLOWED_HOSTS = ['djangocockroachdb.herokuapp.com']
ALLOWED_HOSTS = ['*']


# Application definition

INSTALLED_APPS = [
    'django.contrib.admin',
    'django.contrib.auth',
    'django.contrib.contenttypes',
    'django.contrib.sessions',
    'django.contrib.messages',
    'django.contrib.staticfiles',
    'core.apps.CoreConfig',
    'crispy_forms',
]

MIDDLEWARE = [
    'django.middleware.security.SecurityMiddleware',
    'django.contrib.sessions.middleware.SessionMiddleware',
    'django.middleware.common.CommonMiddleware',
    'django.middleware.csrf.CsrfViewMiddleware',
    'django.contrib.auth.middleware.AuthenticationMiddleware',
    'django.contrib.messages.middleware.MessageMiddleware',
    'django.middleware.clickjacking.XFrameOptionsMiddleware',
]

ROOT_URLCONF = 'game.urls'

TEMPLATES = [
    {
        'BACKEND': 'django.template.backends.django.DjangoTemplates',
        'DIRS': [],
        'APP_DIRS': True,
        'OPTIONS': {
            'context_processors': [
                'django.template.context_processors.debug',
                'django.template.context_processors.request',
                'django.contrib.auth.context_processors.auth',
                'django.contrib.messages.context_processors.messages',
            ],
        },
    },
]

WSGI_APPLICATION = 'game.wsgi.application'

DATABASES = {
    'default': {
        'ENGINE': 'django_cockroachdb',
        'NAME': env('DATABASE_NAME'),
        'USER': env('DATABASE_USER'),
        'PASSWORD': env('DATABASE_URL'),
        'HOST': env('DATABASE_HOST'),
        'PORT': env('DATABASE_PORT'),
    },
}

DATABASES['default'] = dj_database_url.config(default=os.path.expandvars(
    os.environ['DATABASE_URL']), engine='django_cockroachdb')


# Password validation
# https://docs.djangoproject.com/en/3.2/ref/settings/#auth-password-validators

AUTH_PASSWORD_VALIDATORS = [
    {
        'NAME': 'django.contrib.auth.password_validation.UserAttributeSimilarityValidator',
    },
    {
        'NAME': 'django.contrib.auth.password_validation.MinimumLengthValidator',
    },
    {
        'NAME': 'django.contrib.auth.password_validation.CommonPasswordValidator',
    },
    {
        'NAME': 'django.contrib.auth.password_validation.NumericPasswordValidator',
    },
]


# Internationalization
# https://docs.djangoproject.com/en/3.2/topics/i18n/

LANGUAGE_CODE = 'en-us'

TIME_ZONE = 'UTC'

USE_I18N = True

USE_L10N = True

USE_TZ = True

USE_THOUSAND_SEPARATOR = True

THOUSAND_SEPARATOR=','

DECIMAL_SEPARATOR='.'

NUMBER_GROUPING=3


# Static files (CSS, JavaScript, Images)
# https://docs.djangoproject.com/en/3.2/howto/static-files/

STATIC_ROOT = os.path.join(BASE_DIR, 'staticfiles')
STATIC_URL = '/static/'

#setting template pack
CRISPY_TEMPLATE_PACK = 'bootstrap4'


# Default primary key field type
# https://docs.djangoproject.com/en/3.2/ref/settings/#default-auto-field

DEFAULT_AUTO_FIELD = 'django.db.models.BigAutoField'

django_heroku.settings(locals())
Creating the Application in Heroku
Now that we’ve configured our dependencies, we head to the terminal and type the following commands to create our application:
					heroku login
heroku create djangocockroachdb
heroku, where we need to push the application. To initialize Git and push the application to Heroku, we type the following commands:
					git init
git push heroku main
heroku open
git branch -M main to a preferred name like main. The application will crash, and the output of the error leads to a better way of solving these errors.
We add the deployed application’s link to the ALLOWED_HOSTS in the game/settings.py file, like this:
ALLOWED_HOSTS = ['djangocockroachdb.herokuapp.com']
Pushing the File to Heroku
Next, we add the file, commit, and push it to the remote heroku. An example of this is as shown below:
					git add -A && git commit -m “feat: initial commit”
git push heroku master
collectstatic by typing the command heroku config:set DISABLE_COLLECTSTATIC=1 and adding the variables declared in the .env file to Heroku using the heroku config:set option. We can also add the variables directly to Heroku through the Config var tab by going to Settings in the Heroku dashboard. After adding our .env values, the Config var should look like this image: 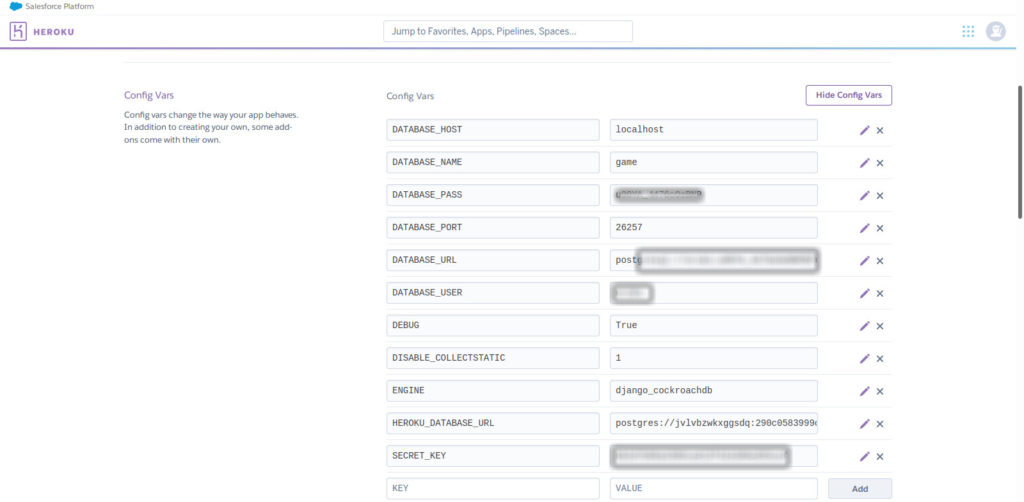
DATABASE_URL from CockroachDB directly to Heroku won’t be successful, as Heroku creates a default Postgres URL when we create your app. To change to DATABASE_URL from CockroachDB, we need to run these commands:
heroku addons:attach heroku-postgresql -a <app_name> --as HEROKU_DATABASE_URL
heroku addons:detach DATABASE -a <app_name>
heroku config:add DATABASE_URL=”postgresql://<username>:<password>@<serverless-host>:26257/defaultdb?sslmode=verify-full&sslrootcert=certs/root.crt&options=--cluster=<cluster-id>
heroku open in the terminal. The output should be like this: 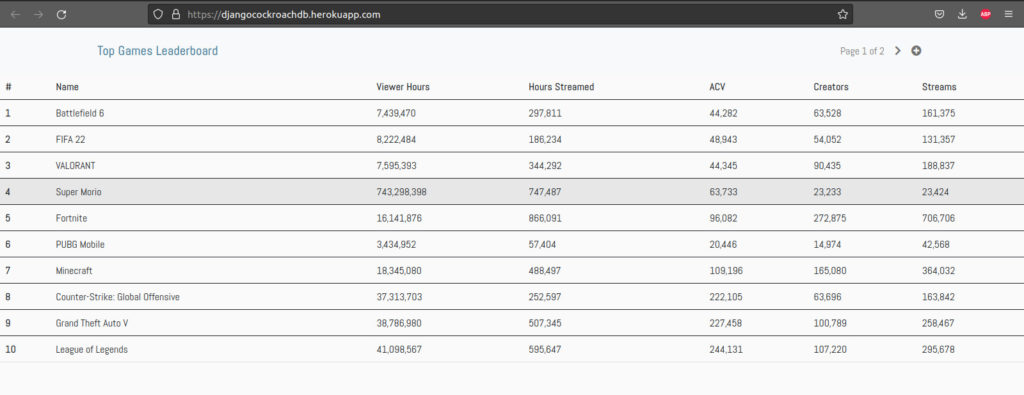
CockroachDB Serverless saves our data in the cloud so we can access our game leaderboard information from anywhere.
View the app running on Heroku.
Next Steps
We’ve now created a simple Django application using CockroachDB — via CockroachDB Serverless — as the database and deployed the application to Heroku. We don’t need to migrate our database when using CockroachDB.
Now that you know how well Django and CockroachDB work together, you can improve your application by adding more fields or displaying information from multiple users. This code can also provide the foundation for any unique new application that stores and accesses information in a serverless database.
Sign up for a CockroachDB account to begin building your own Django web app backed by the CockroachDB serverless database.
If you’re interested in developing expert technical content that performs, let’s have a conversation today.